Virtual and Augmented Reality together are now referred to as XR or “Extended-Reality”. You’re in the right place at the right time to build something amazing in XR!
XR applications can be created in Unity for many devices, our focus will be on Microsoft Hololens and the Oculus Quest 2 – in this blog post series we will specifically focus on Oculus Quest 2 in the latest Unity 2021.
Let’s start building our XR experience together!
Here’s my XR Step-by-Step blog series to help you create your XR experiences!
1) Installing the Tools you need for XR development == Unity 2021
2) Setting up your Oculus Quest XR project in Unity 2021!
3) Setting up Mixed-Reality Passthrough for your Oculus Quest XR project in Unity 2021!
4) Keep your XR project safe with a GitHub Code Repo!
5) Setting up Touch Controller for your Oculus Quest XR project in Unity 2021!
6) Coding your Touch Controller for your Oculus Quest XR project in Unity 2021!
For Quick Reference, here is the summary of all steps to setup your XR project – followed by the detailed Step-by-Step with images and additional BONUS content at the end!
- (Template) 3D (URP) -> Create
- *(Toolbar) Window -> Layouts -> Wide (*optional)
- (Project Window) Right-click -> Create -> Scene
- (Hierarchy Window) Right-click on the Main Camera -> Delete
- (Toolbar) File -> Build Settings
- (Build Settings) Add Open Scenes -> Check/Uncheck Scenes
- (Build Settings) Platform -> Android -> Switch Platform
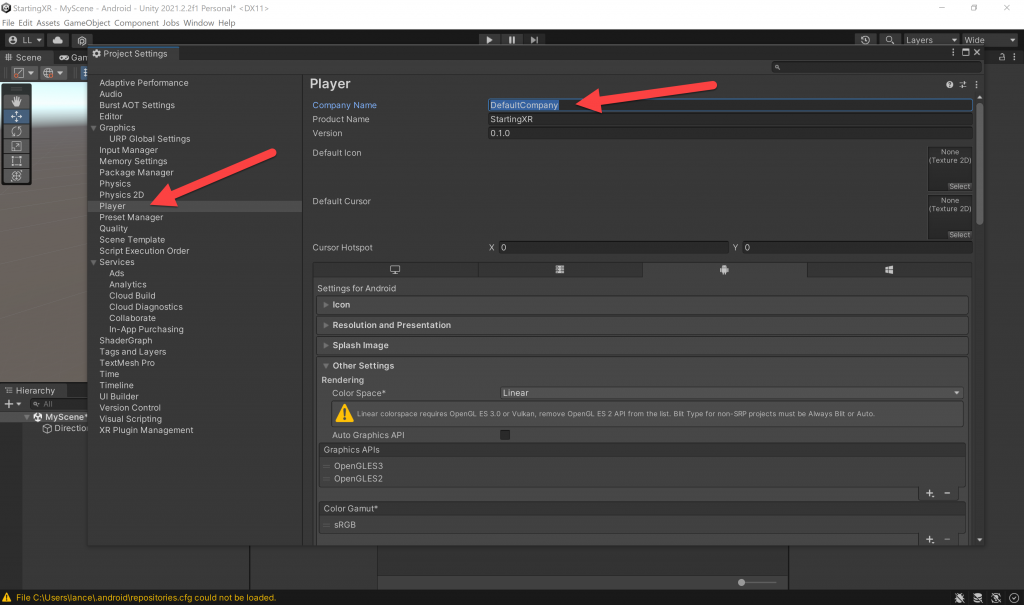
- (Toolbar) Edit -> Project Settings…
- (Project Settings) Player -> Change Company Name
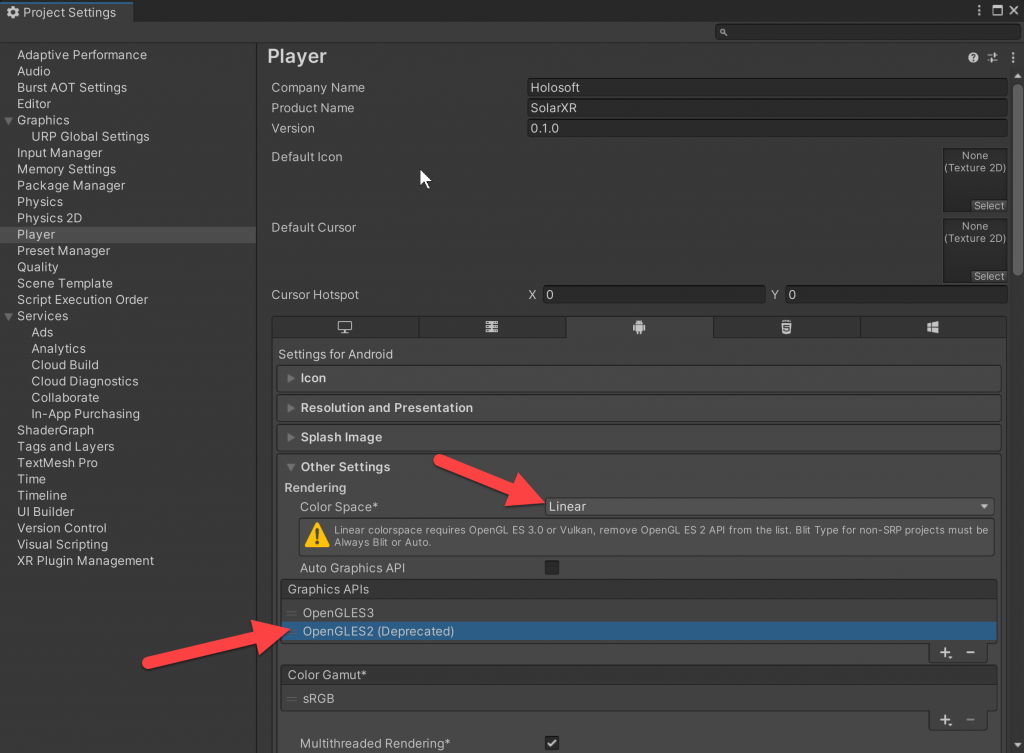
- (Project Settings) Player -> Other Settings -> Color Space should be Linear -> Delete OpenGLES2 (Depreciated)
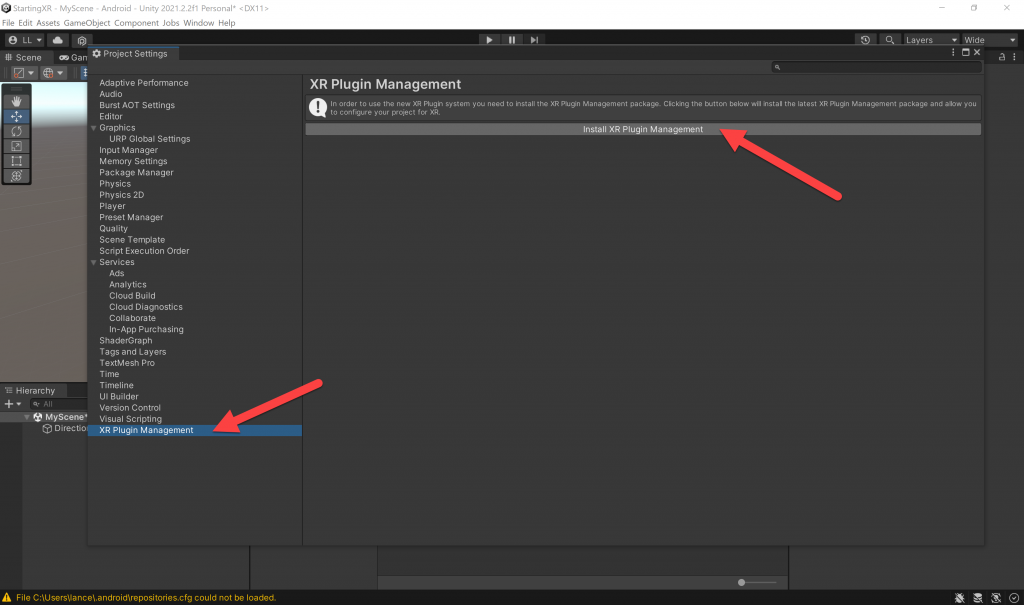
- (Project Settings) XR Plug-in Management -> Install XR Plugin Management button
- (Project Settings) XR Plug-in Management -> Check the Oculus option under the Android + Windows tab
- (Toolbar) Window -> Package Manager
- (Package Manager) Switch from Packages: In Project -> Packages: My Assets
- (Package Manager) Click Oculus Integration -> Import (Answer Yes, Ok, etc)
- (Project Window Search Bar) Search for OVRCameraRig -> Drag OVRCameraRig Prefab into scene
- (Toolbar) File -> Build Settings…
- (Build Settings) Run Device -> choose Quest device -> Click Build and Run button
- (Build Android) File Name -> name it Install -> Click Save
Full Step-by-Step Instructions!
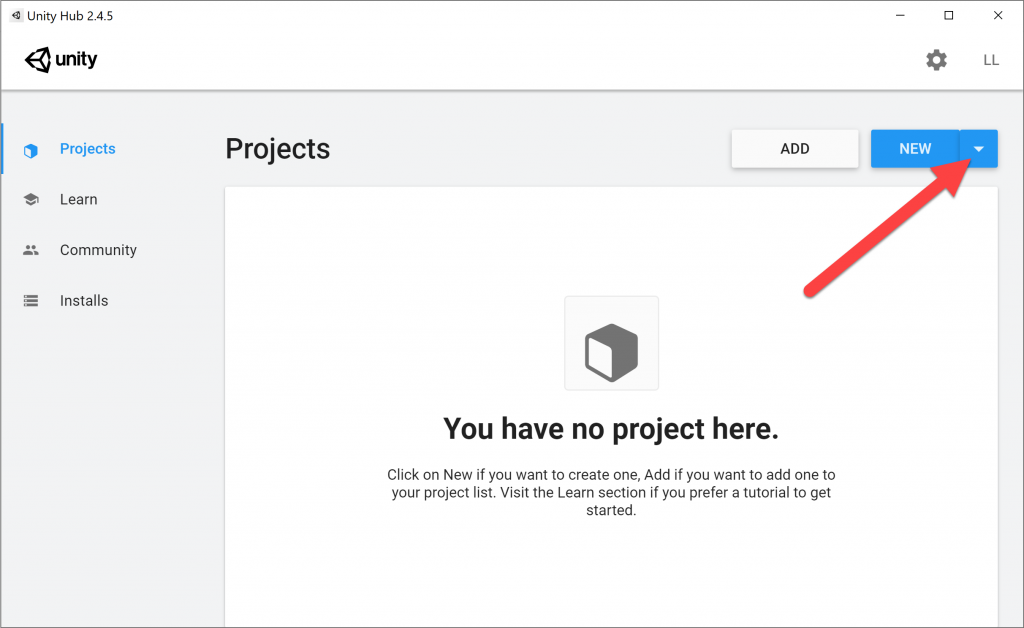
- Open Unity Hub and click on the down arrow next the New
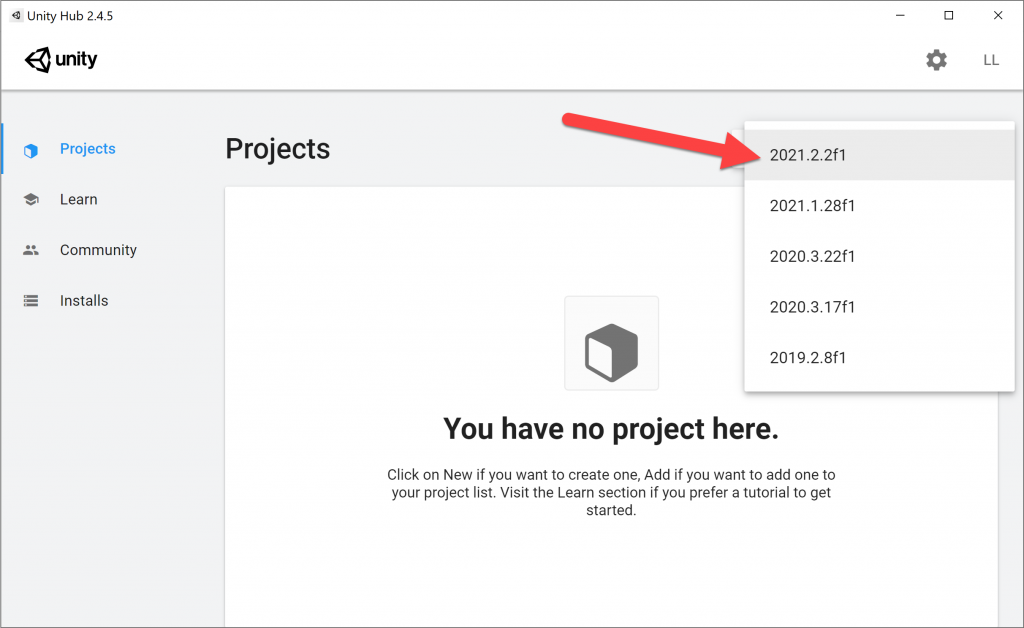
- Select the latest version of 2021 then click on New
- (Template) Choose 3D URP
- Universal Render Pipeline is the most performant 3D starting point for our XR project.
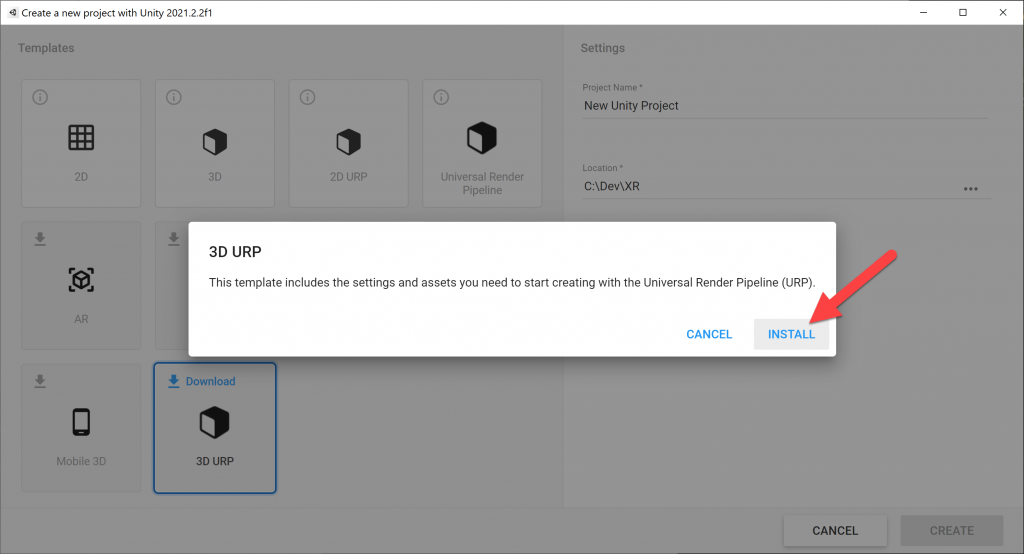
- If you haven’t used the template before, you’ll need to click on Download and then Install the 3D URP template.
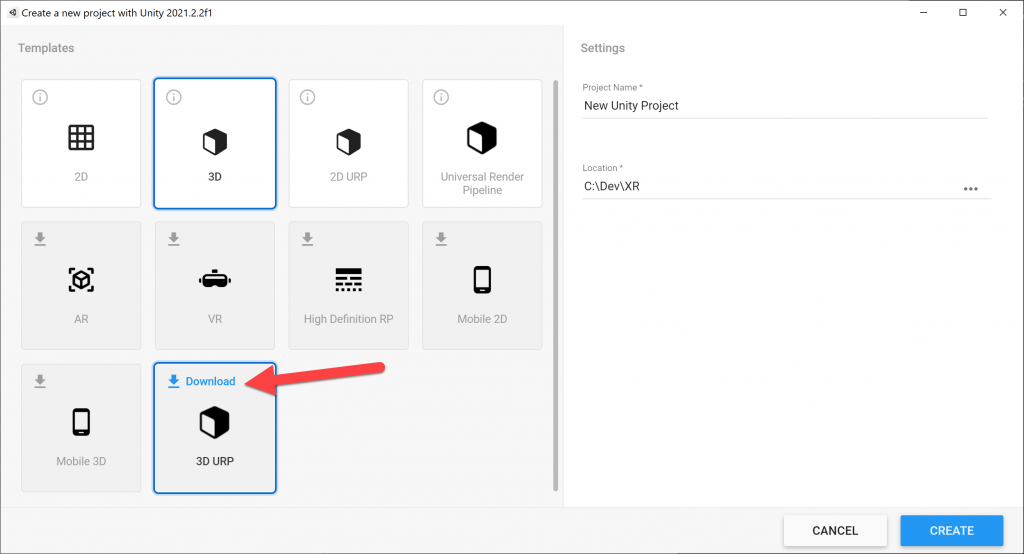
- Name your project and click Create
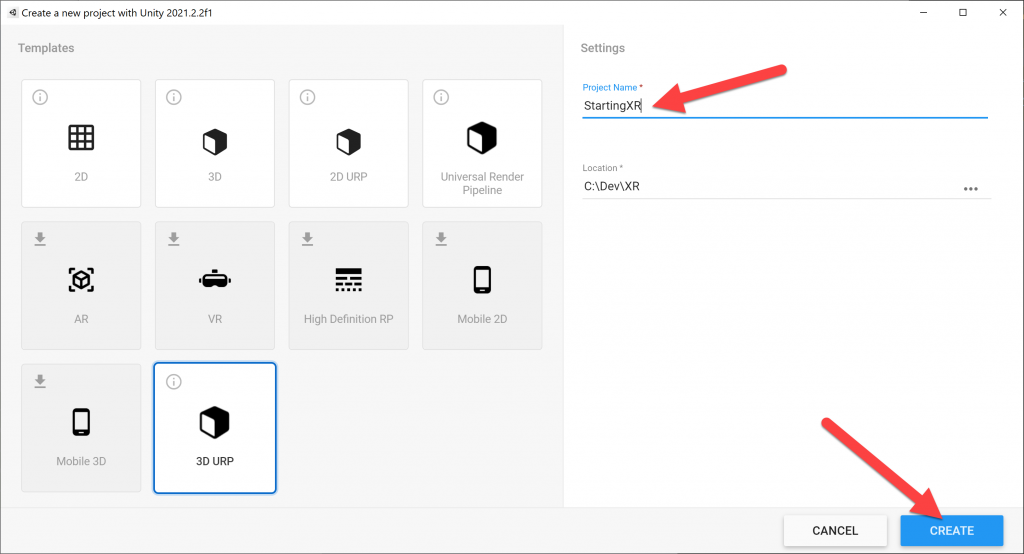
- Creating a project takes a couple of minutes – as the base projects are pretty large (~1.2GB)
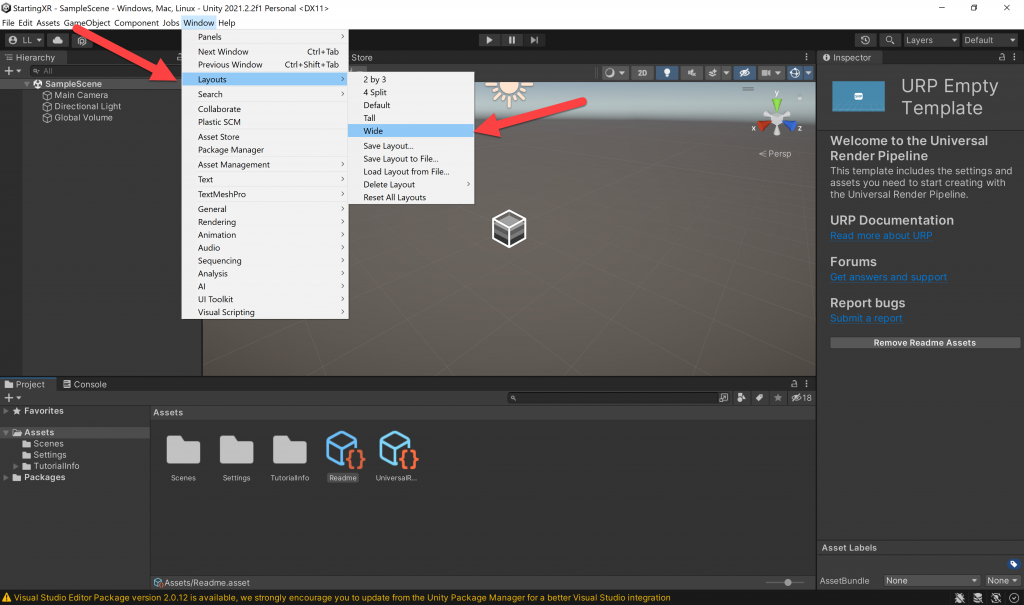
- Pro-Tip: (Toolbar) Window -> Layouts -> Wide
- There are several different layouts of your Unity windows, I prefer “Wide” layout.
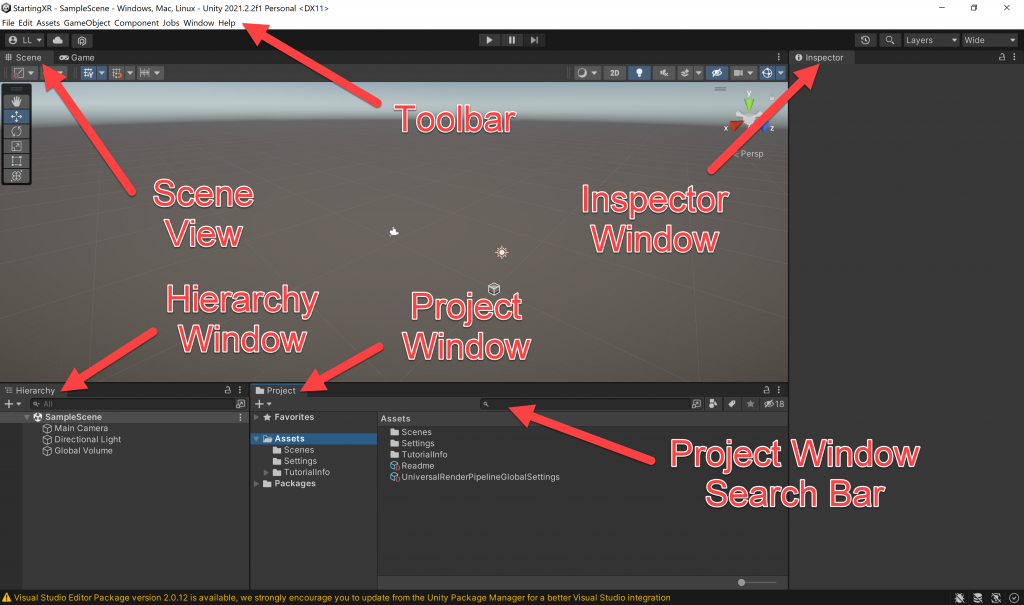
- So we’re all talking about the same things, here are the parts of the Unity Window and what they’re called.
- (Project Window) Under Assets click on Scenes. Think of scenes as different levels in a game.
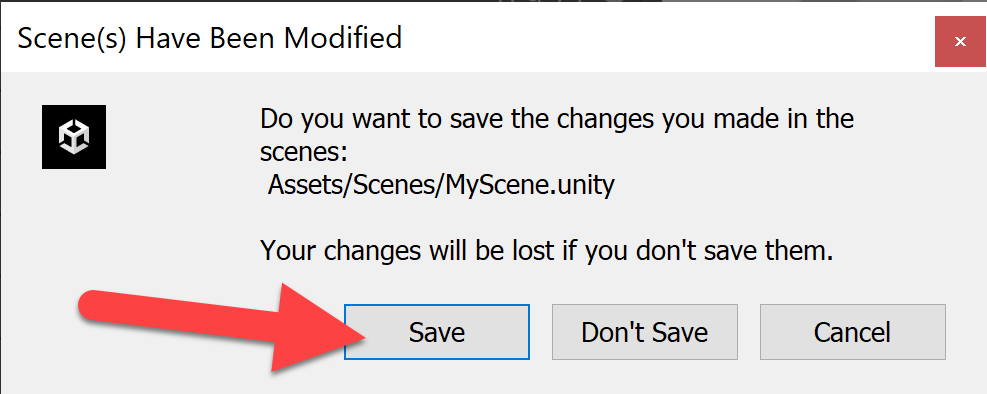
- (Project Window) Right-click -> Create -> Scene. Name it MyScene (or whatever).
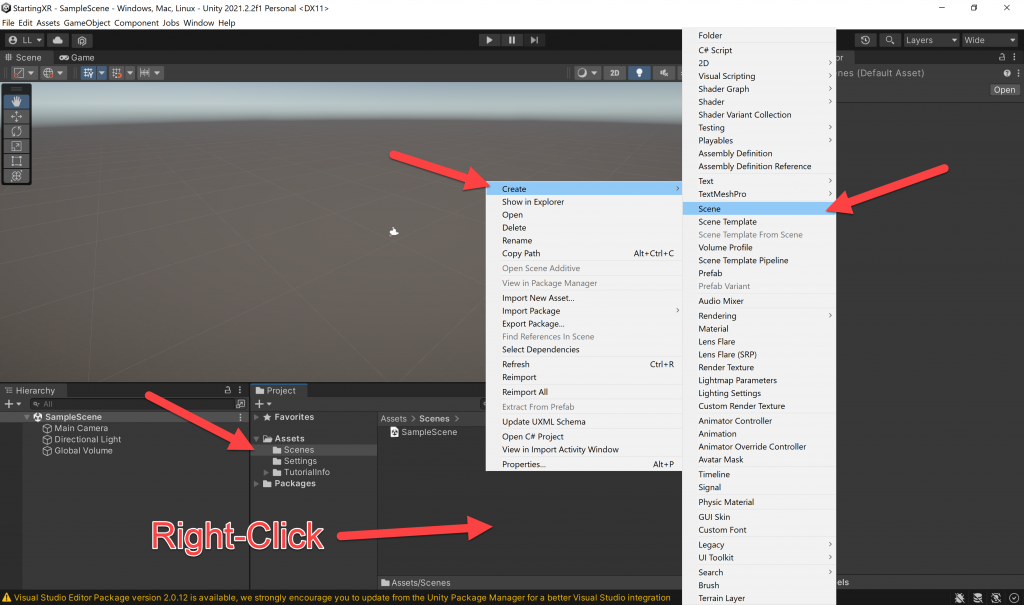
- (Project Window) Click on your new scene name so it shows up in the (Hierarchy Window).
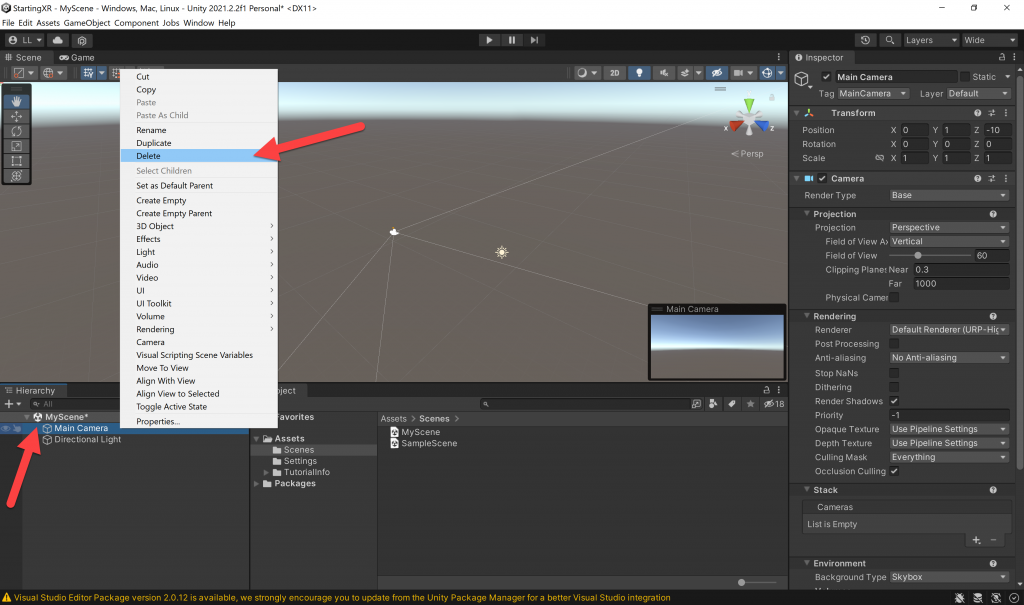
- (Hierarchy Window) Right-click on the Main Camera -> Delete.
- We do this because we we’re going to add a better camera for VR later.
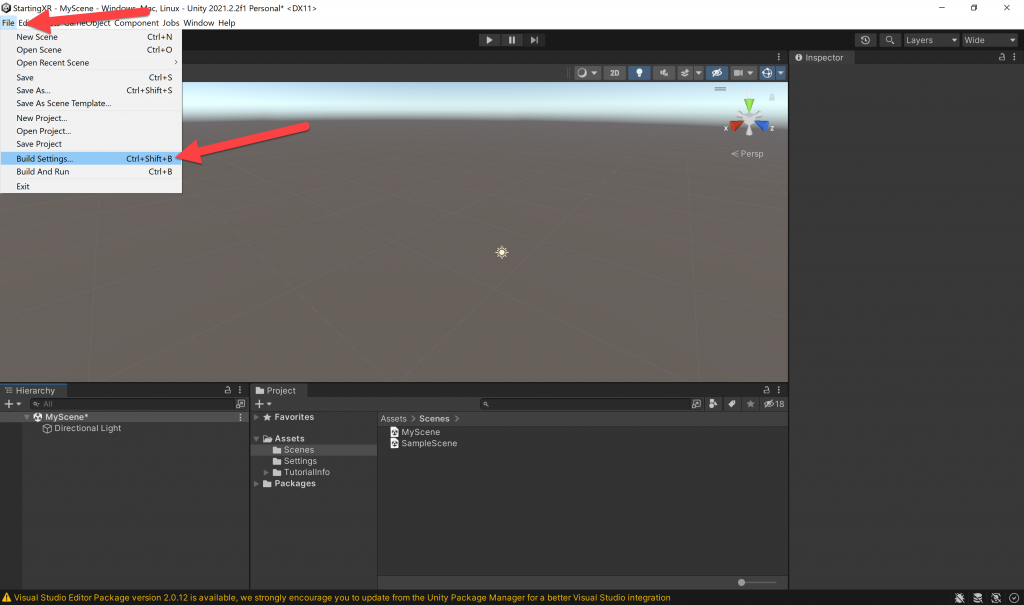
- (Toolbar) File -> Build Settings
- Now that we have a new scene we’re going to configure your project for VR.
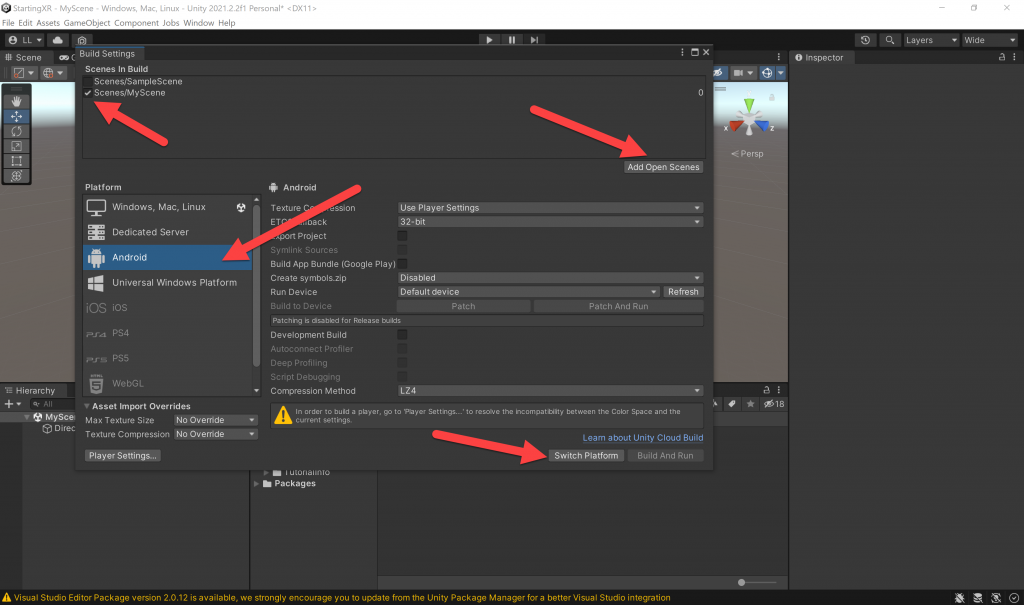
- (Build Settings)
- Click on the Add Open Scenes button
- Uncheck Scenes/SampleScene
- Check Scenes/MyScene
- Under Platform, click on Android
- Click on the Switch Platform button
- (Toolbar) Edit -> Project Settings…
- (Project Settings) Player -> Change Company Name
- (Project Settings) Player -> Other Settings -> Color Space should be Linear -> Delete OpenGLES2 (Depreciated)
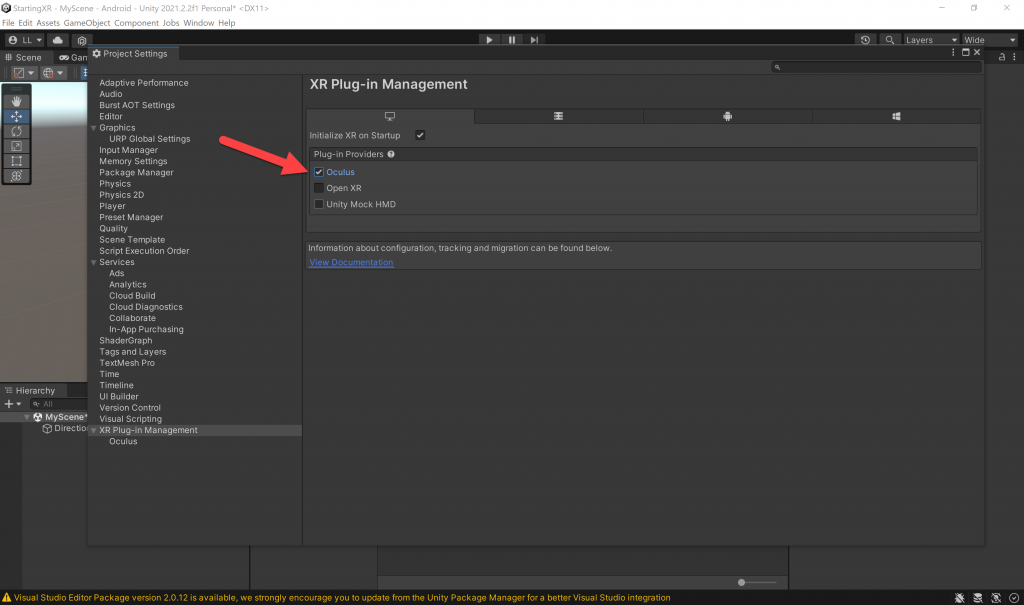
- (Project Settings) XR Plug-in Management -> Install XR Plugin Management button
- (Project Settings) XR Plug-in Management -> Check the Oculus option under the Android Settings tab
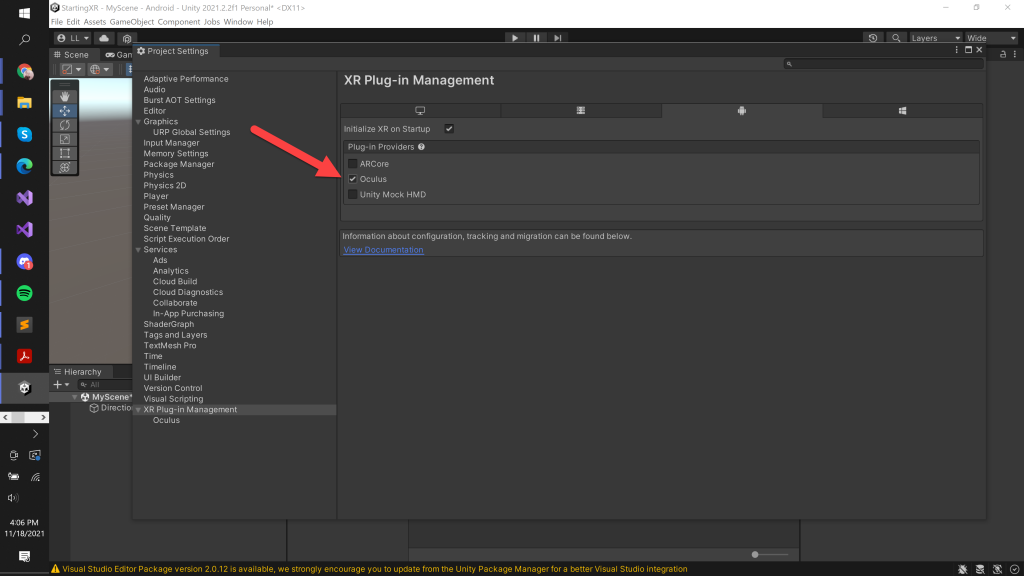
- (Project Settings) XR Plug-in Management -> Check the Oculus option under the Windows, Mac, Linux settings tab
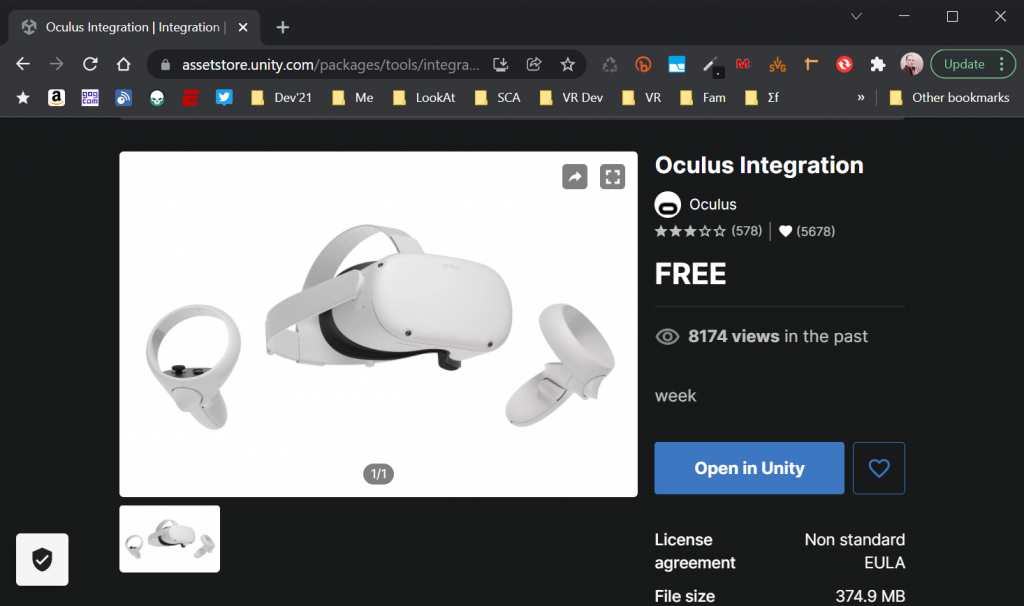
- We now need to go download a free asset from the oculus asset store — go to assetstore.unity.com — and search for Oculus Integration and install that.
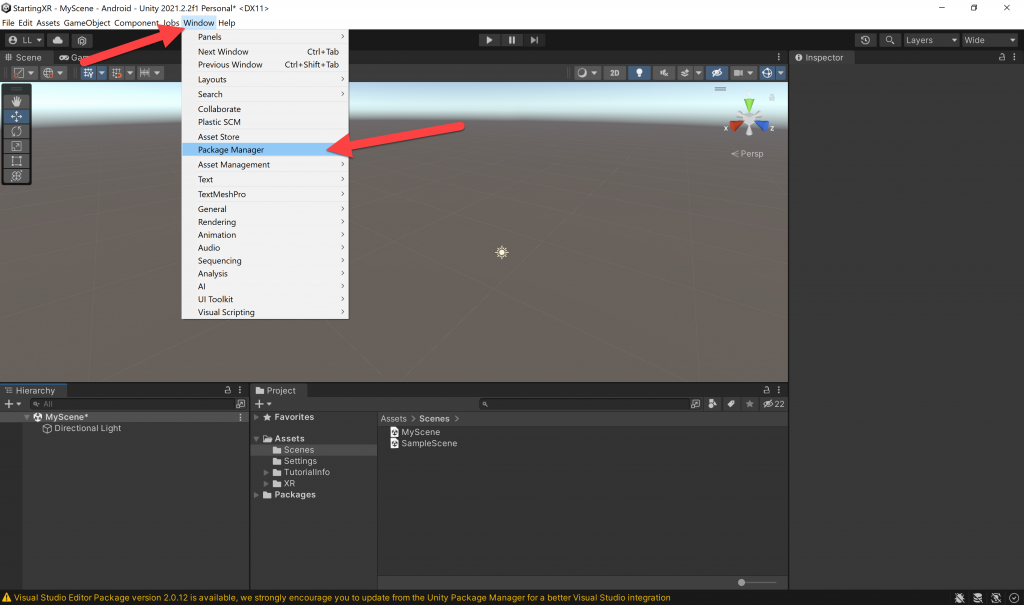
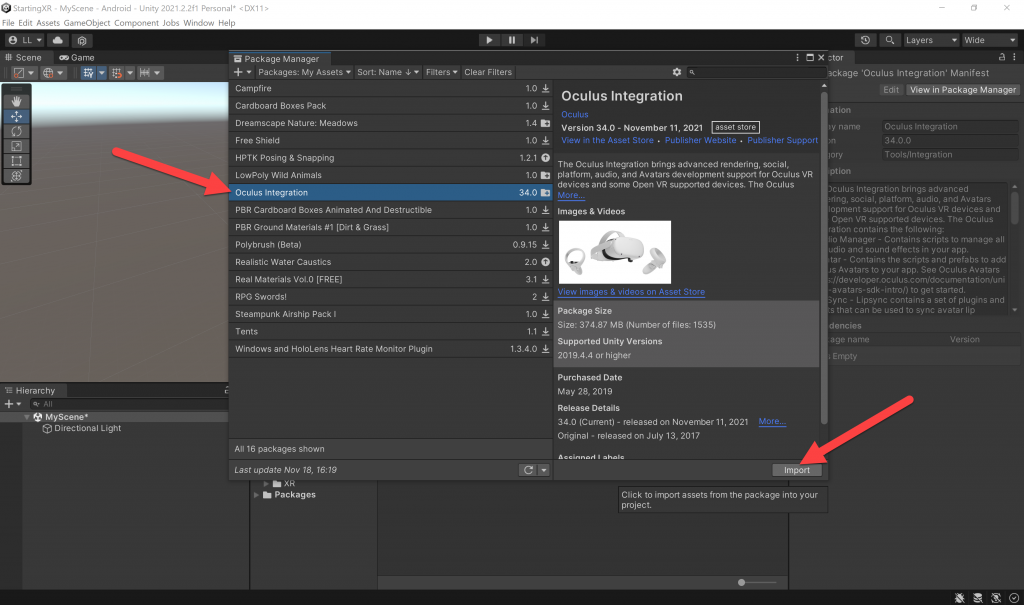
- (Toolbar) Window -> Package Manager
- (Package Manager) Switch from Packages: In Project -> Packages: My Assets
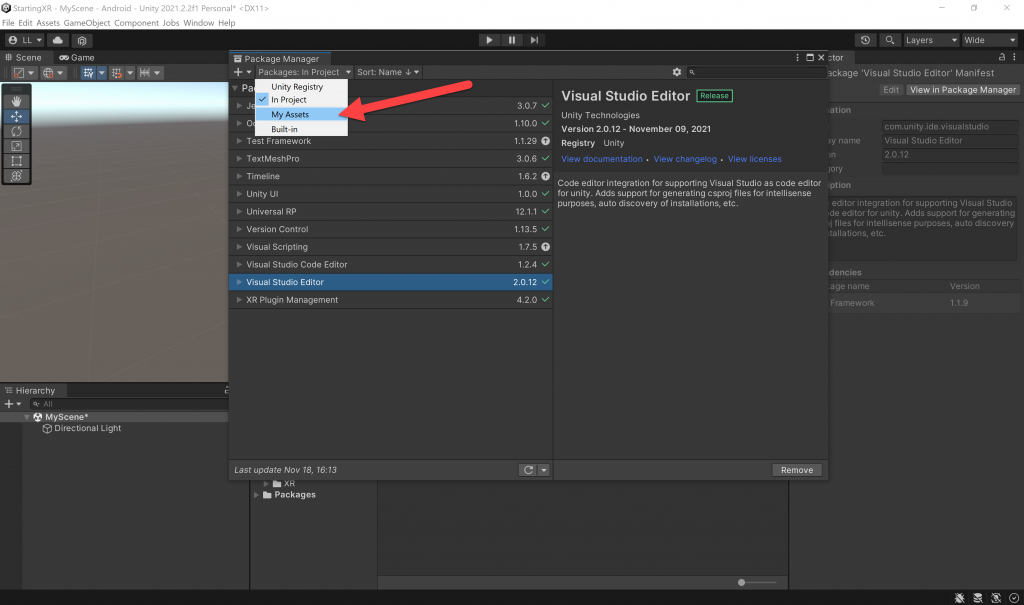
- (Package Manager) Click Oculus Integration -> Import
- We now see that there are a lot of assets that are part of this package, I encourage you to glance through them and in the future you may only want some of them – but for now just click on Import and we’ll add all of them to our project.
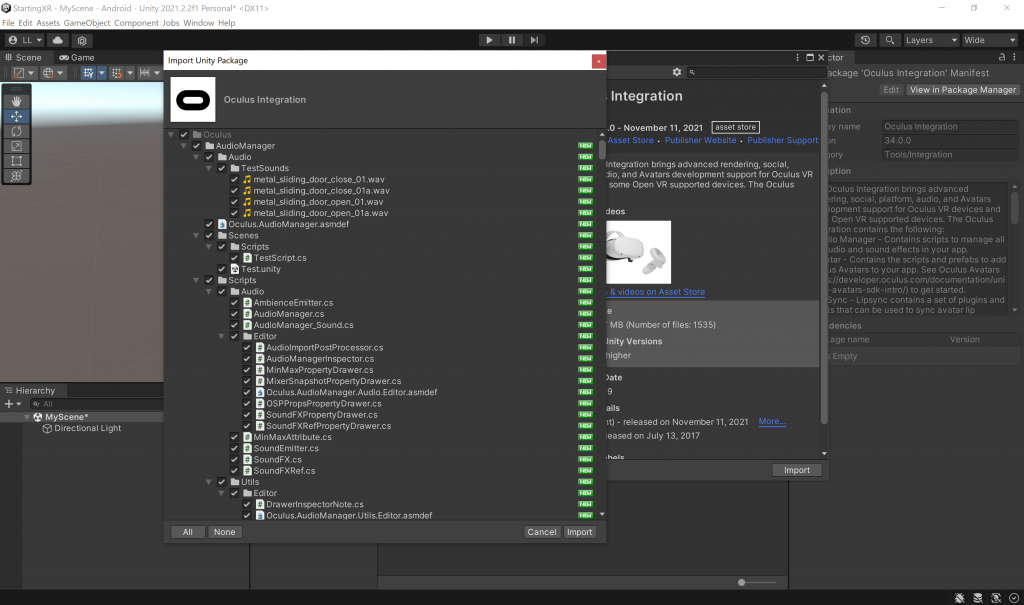
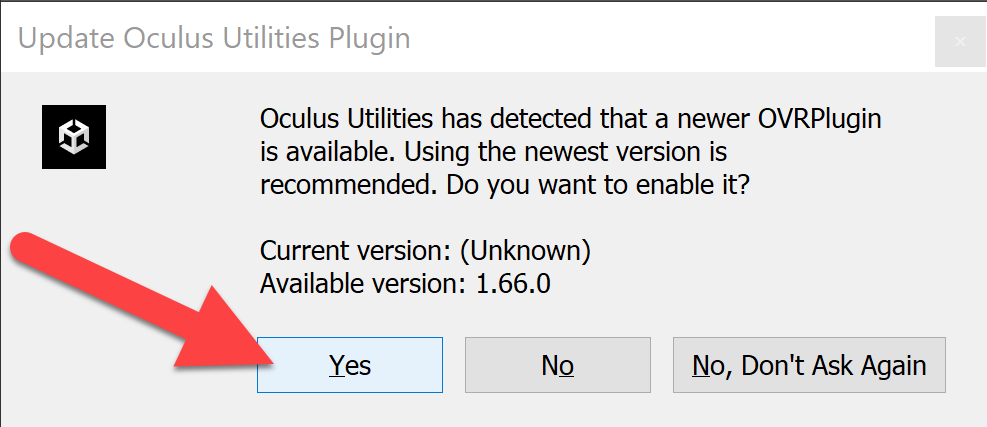
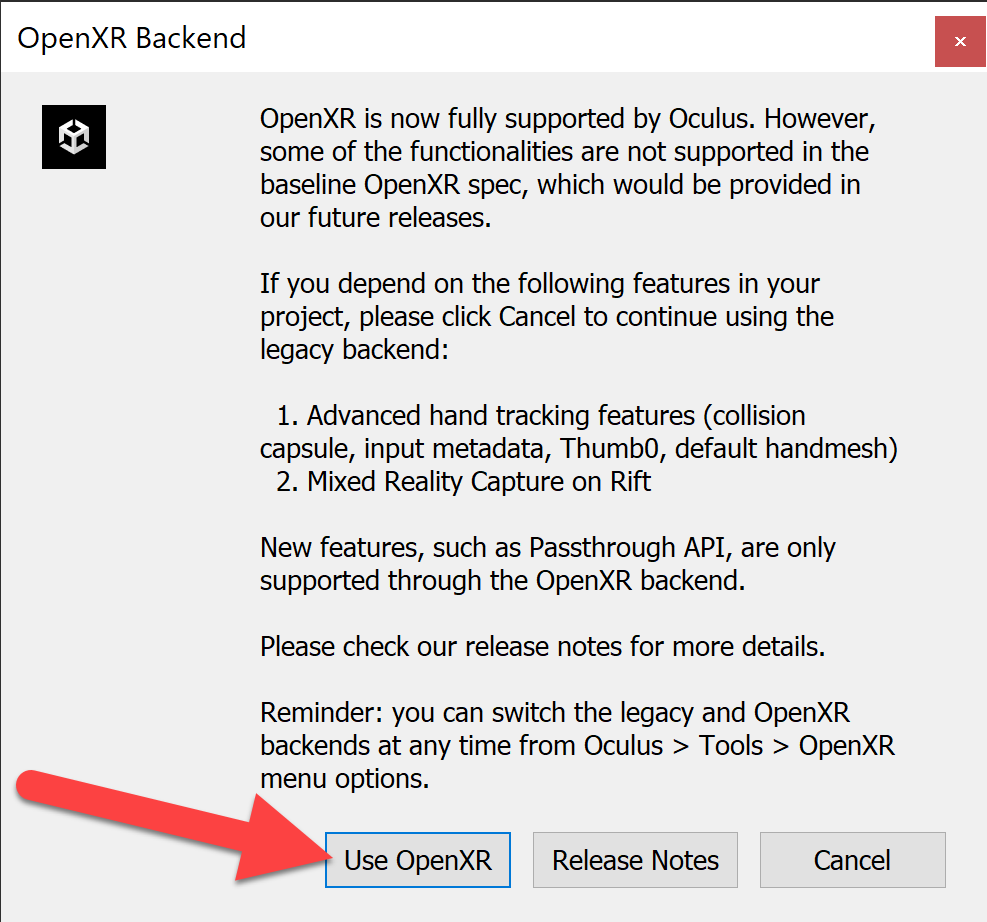
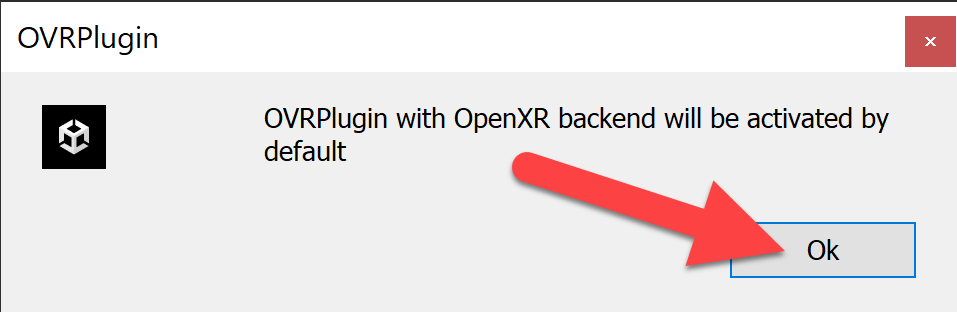
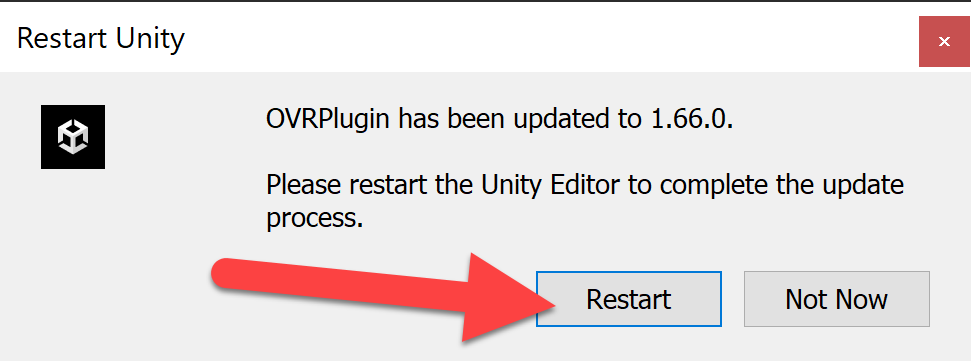
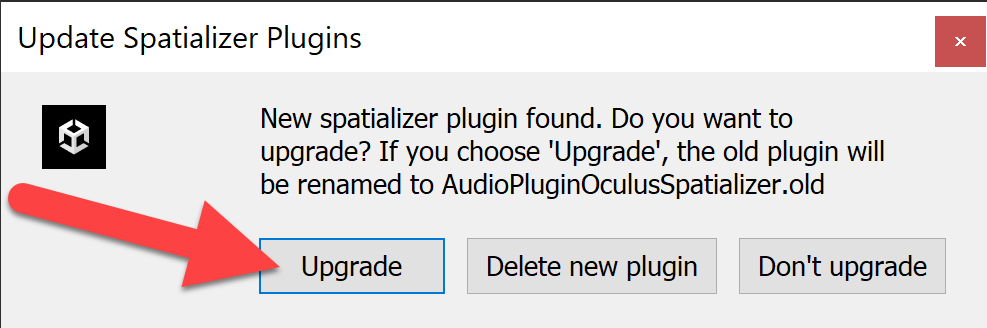
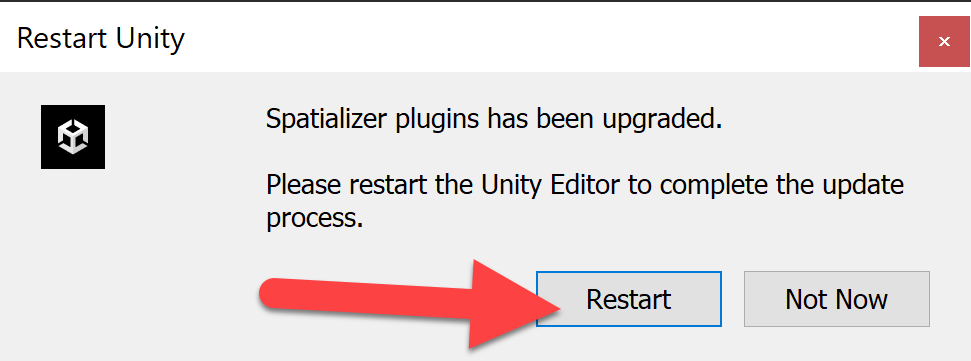
- This will likely take several minutes, and we should expect to click through quite a few dialog boxes as follows…
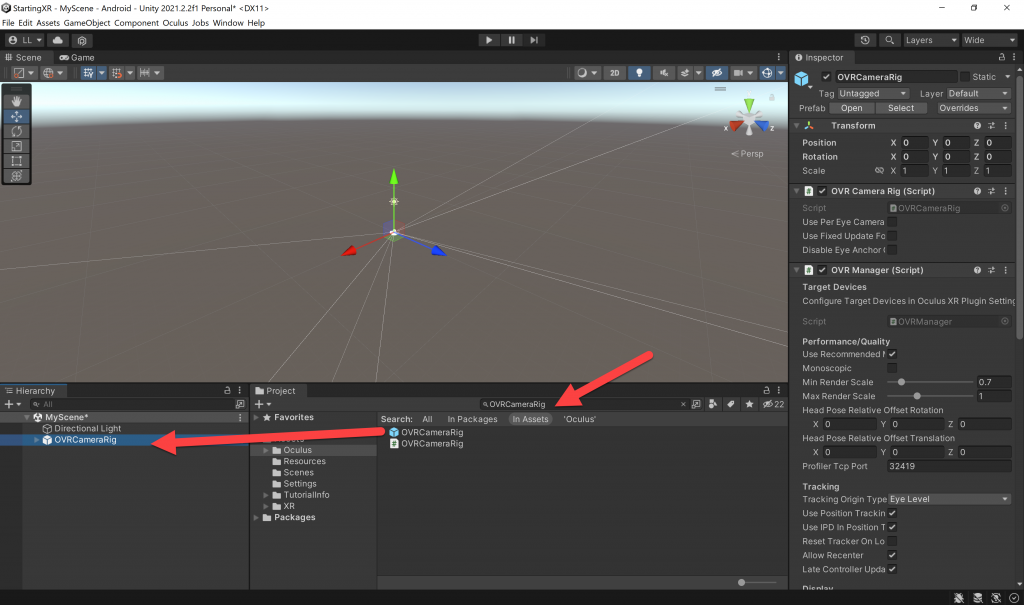
- (Project Window Search Bar) Search for OVRCameraRig -> Drag the OVRCameraRig Prefab (the one with the blue square) into your (Hierarchy Window) Scene
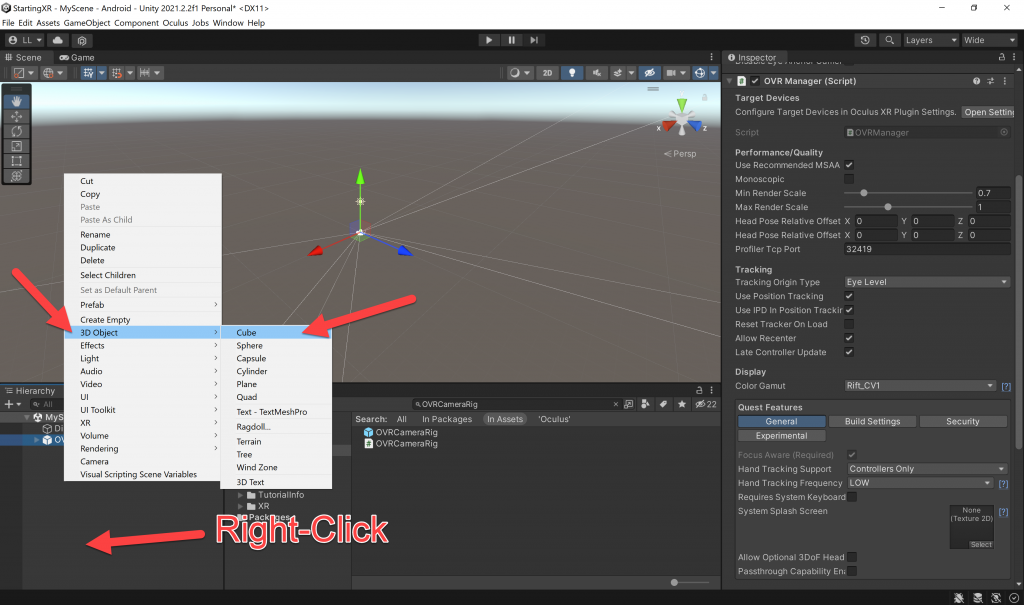
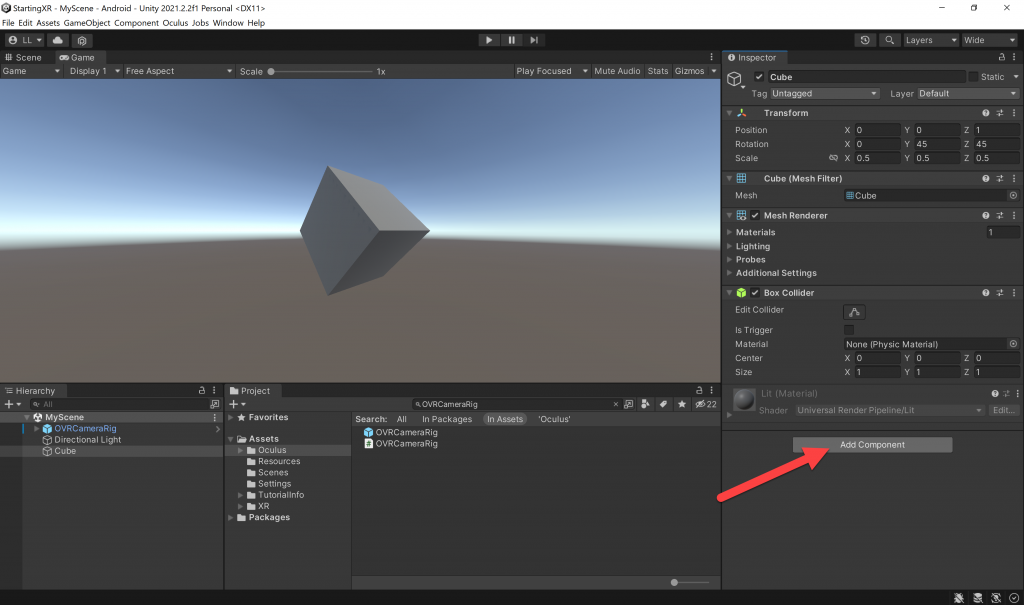
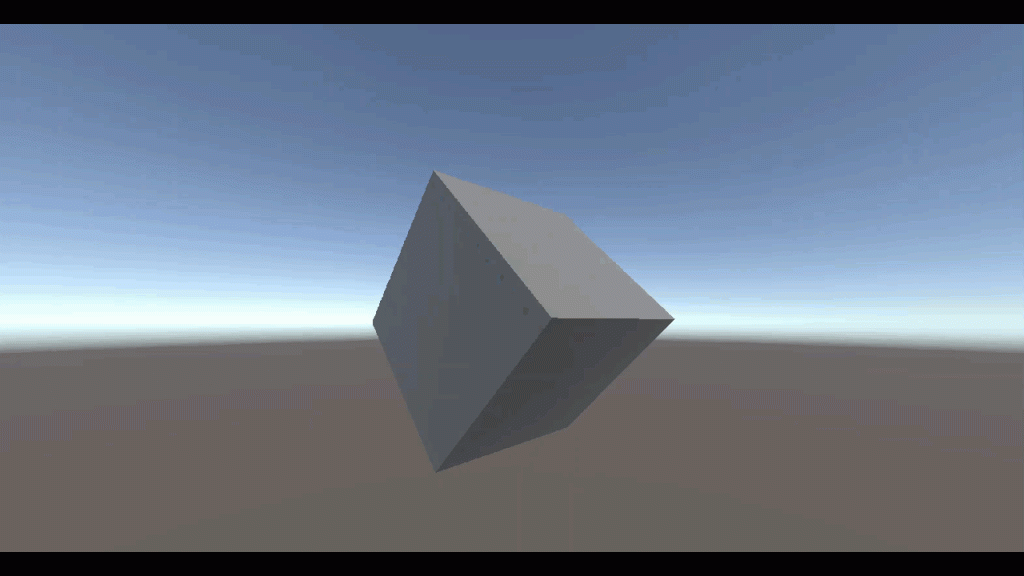
- BONUS: Let’s add a Cube so we can test XR project!
- (Hierarchy Window) Right-click -> 3D Object -> Cube
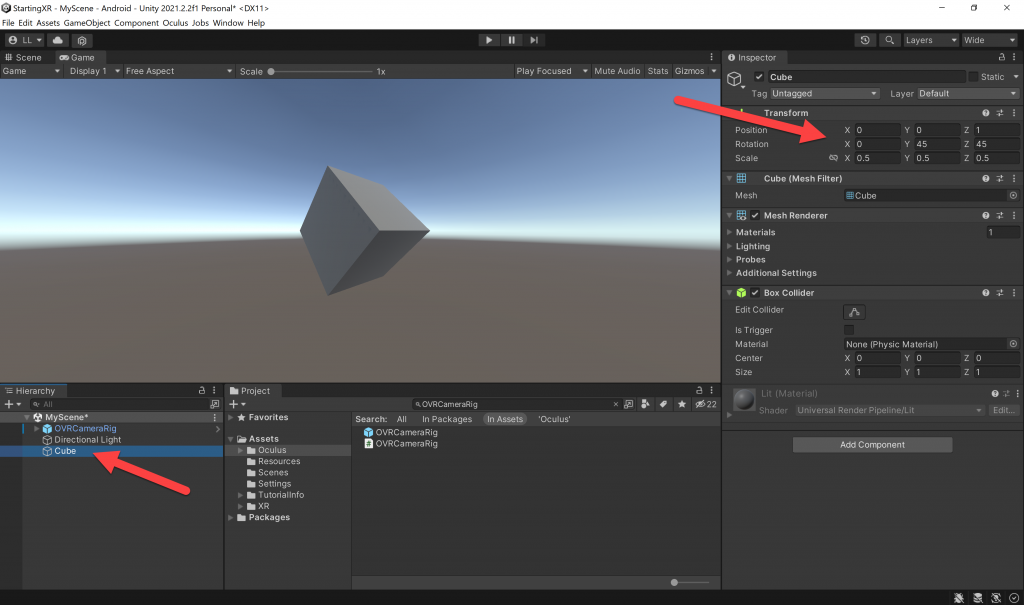
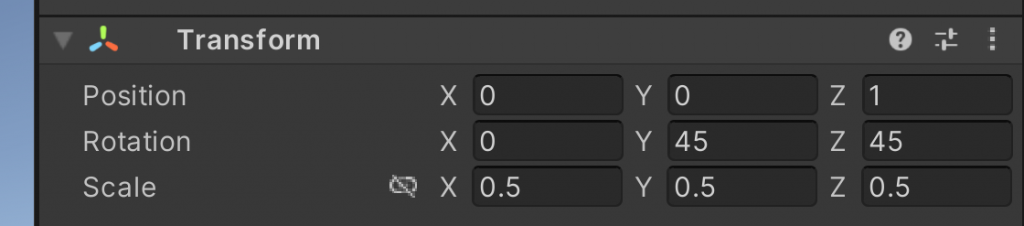
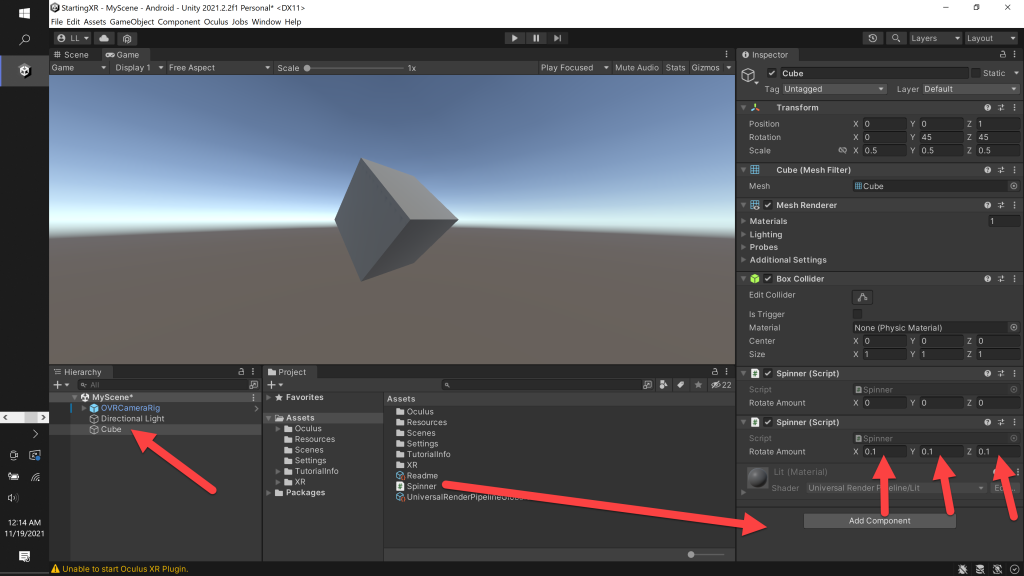
- (Hierarchy Window) Click on Cube asset -> (Inspector Window) Change Position, Rotation and Scale to the following…
- Setting the Scale to 0.5 make the cube smaller
- Setting the Rotation by 45 (degrees) on both Y and Z makes it more interesting to look at 🙂
- Setting the Z Position puts it in front of the user when they start the XR project
- Let’s make the Cube spin!
- (Inspector Window) Click Add Component button
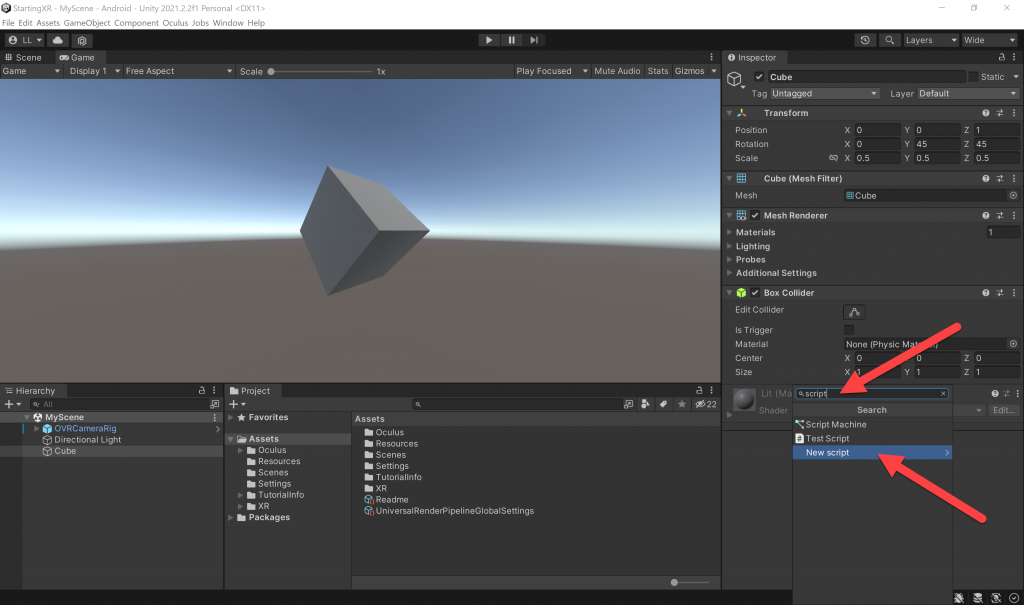
- (Inspector Window) Enter script in search bar -> Click on New script and name your script “Spinner”
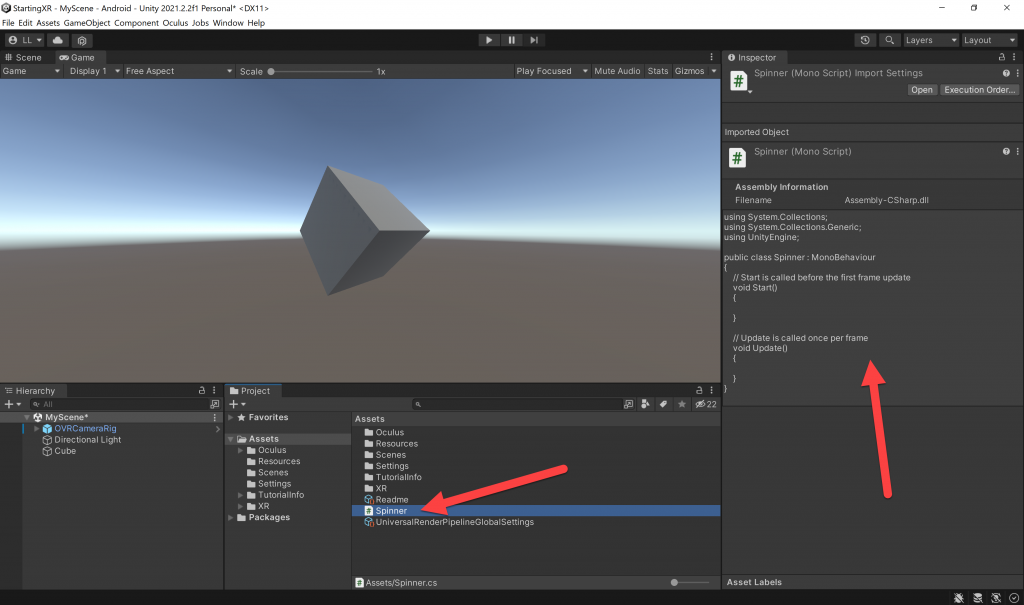
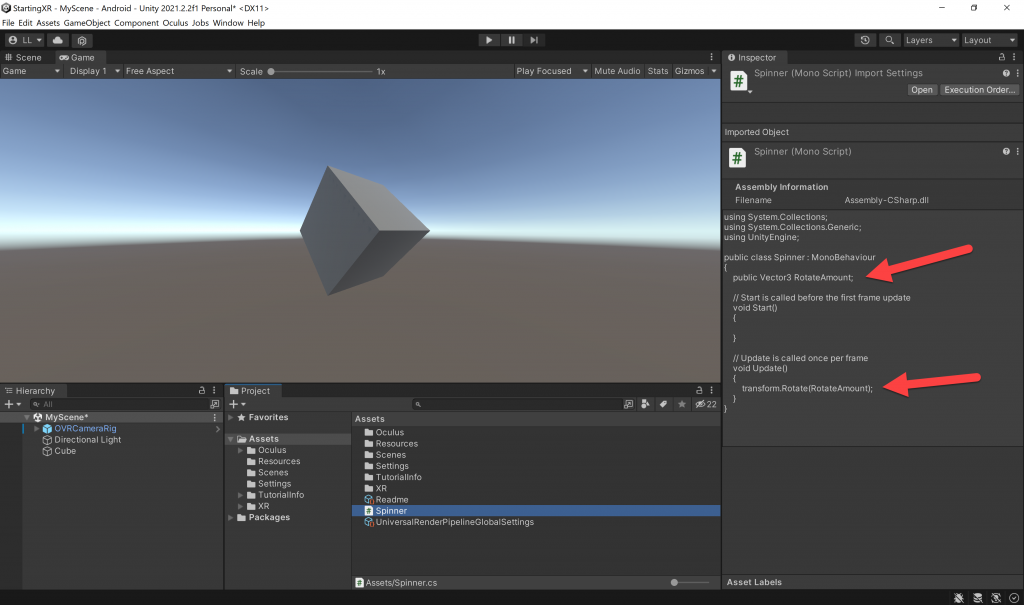
- (Project Window) Click on your Spinner script and you’ll see the script in the (Inspector Window)
- (Project Window) Double-Click on your Spinner script and it will open Visual Studio
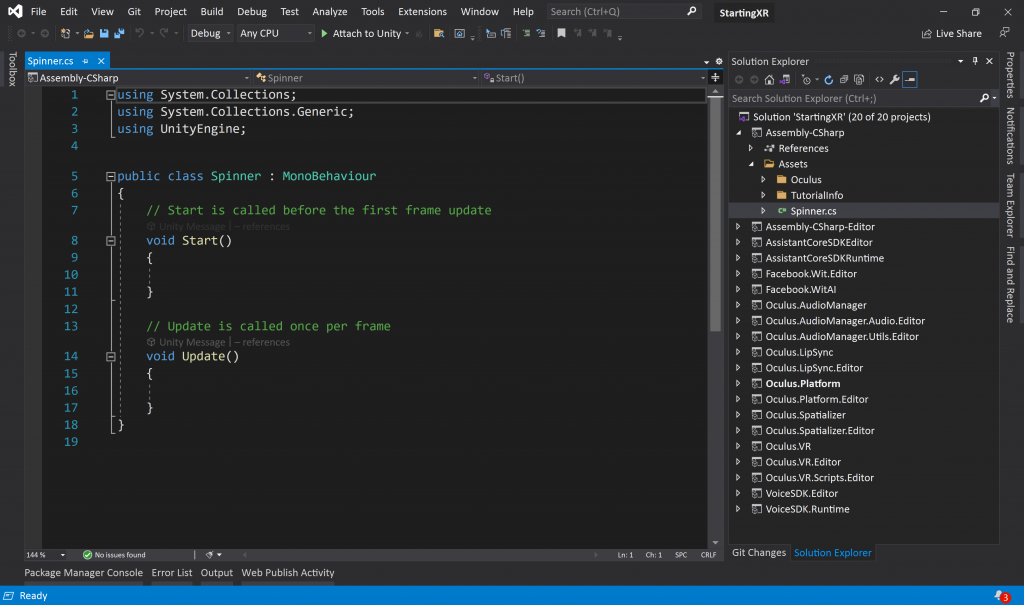
- You’ll see two methods in your C# script
- Start(): Runs once before the cube is created in the scene.
- Update(): Runs every frame, refresh is generally 60 to 90 frames/second.
- Just add the two lines below and Save your changes!

- (Inspector Window) You will see your update code in Unity!
- (Hierarchy Window) Select Cube -> (Project Window) Drag your Spinner script onto the (Inspector Window) for your cube
- Set the Rotate Amount for X, Y and Z = 0.1 (play around with these values!)
- Now let’s run your project on your Quest!
- (Toolbar) File -> Build Settings…
- (Build Settings) In Run Device -> choose your Oculus Quest device -> Click Build and Run button
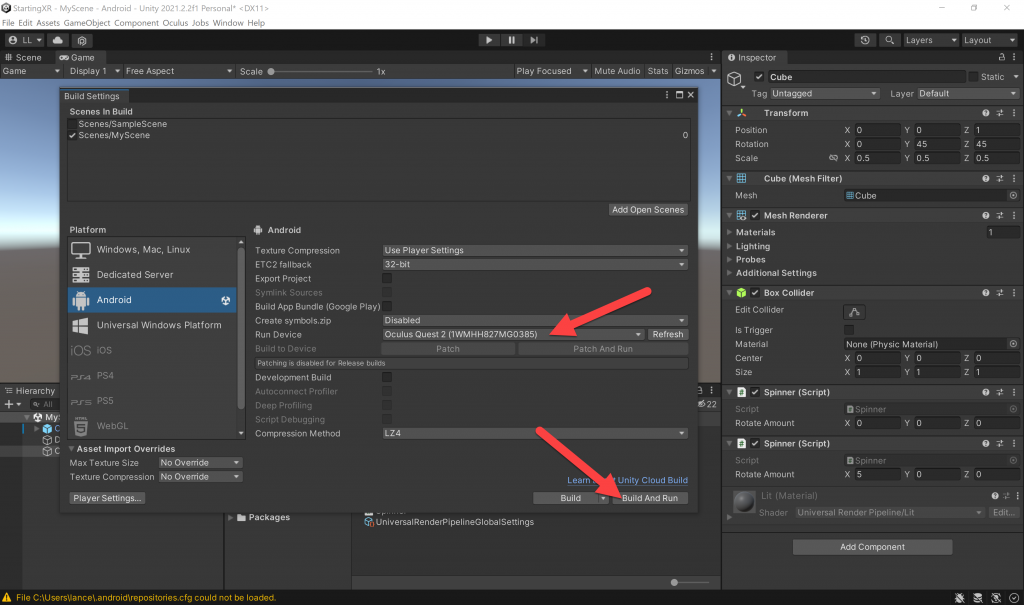
- (Build Android) In File Name -> I usually name it Install, could be anything -> Click Save

- That’s it! You should now see a rotating cube in your XR experience on your Quest! Congrats to you!
Love any feedback and see you in future XR blog posts.
Build something amazing in XR! — Lance
Here’s my XR Step-by-Step blog series to help you create your XR experiences!
1) Installing the Tools you need for XR development == Unity 2021
2) Setting up your Oculus Quest XR project in Unity 2021!
3) Setting up Mixed-Reality Passthrough for your Oculus Quest XR project in Unity 2021!
4) Keep your XR project safe with a GitHub Code Repo!
5) Setting up Touch Controller for your Oculus Quest XR project in Unity 2021!
6) Coding your Touch Controller for your Oculus Quest XR project in Unity 2021!

13 thoughts on “XR Step-by-Step! Setting up your Oculus Quest XR project in Unity 2021!”