Virtual and Augmented Reality together are now referred to as XR or “Extended-Reality”. You’re in the right place at the right time to build something amazing in XR!
XR applications can be created in Unity for many devices, our focus will be on Microsoft Hololens and the Oculus Quest 2 – in this blog post series we will specifically focus on Oculus Quest 2 in the latest Unity 2021.
We’ve made a ton of progress so far in creating your XR experience! Now we want to be able to start interacting with our XR environment – so let’s add our Quest Touch controllers to our project!
Here’s my XR Step-by-Step blog series to help you create your XR experiences!
1) Installing the Tools you need for XR development == Unity 2021
2) Setting up your Oculus Quest XR project in Unity 2021!
3) Setting up Mixed-Reality Passthrough for your Oculus Quest XR project in Unity 2021!
4) Keep your XR project safe with a GitHub Code Repo!
5) Setting up Touch Controller for your Oculus Quest XR project in Unity 2021!
6) Coding your Touch Controller for your Oculus Quest XR project in Unity 2021!
Quick Reference summary of all steps to add controllers for your XR project, followed by the detailed Step-by-Step with images!
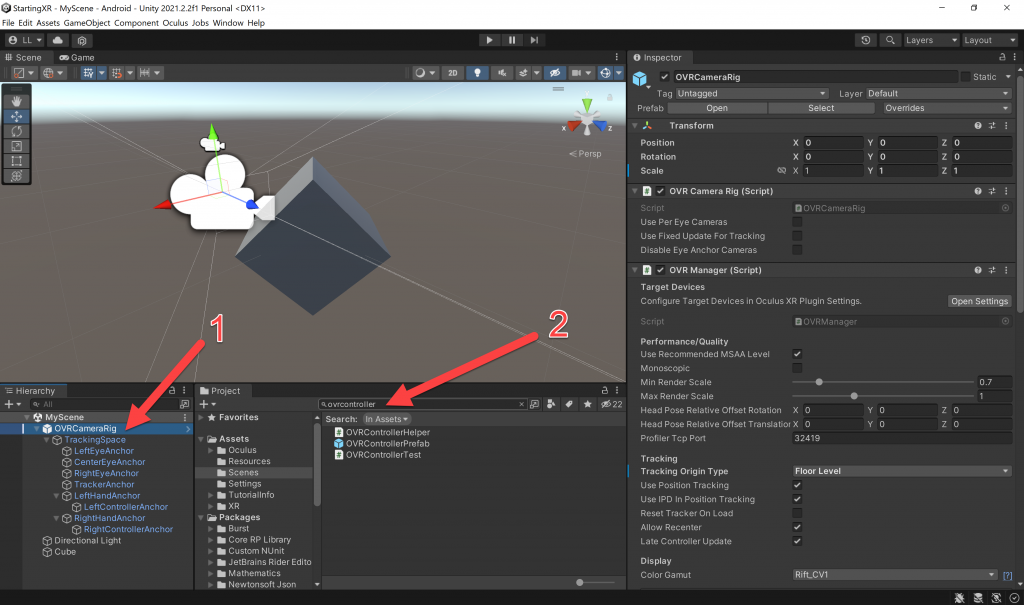
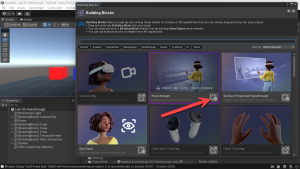
- (Hierarchy) Click on OVRCameraRig -> expand to see LeftHandAnchor and RightHandAnchor
- (Project Search Bar) Type OVRControllerPrefab
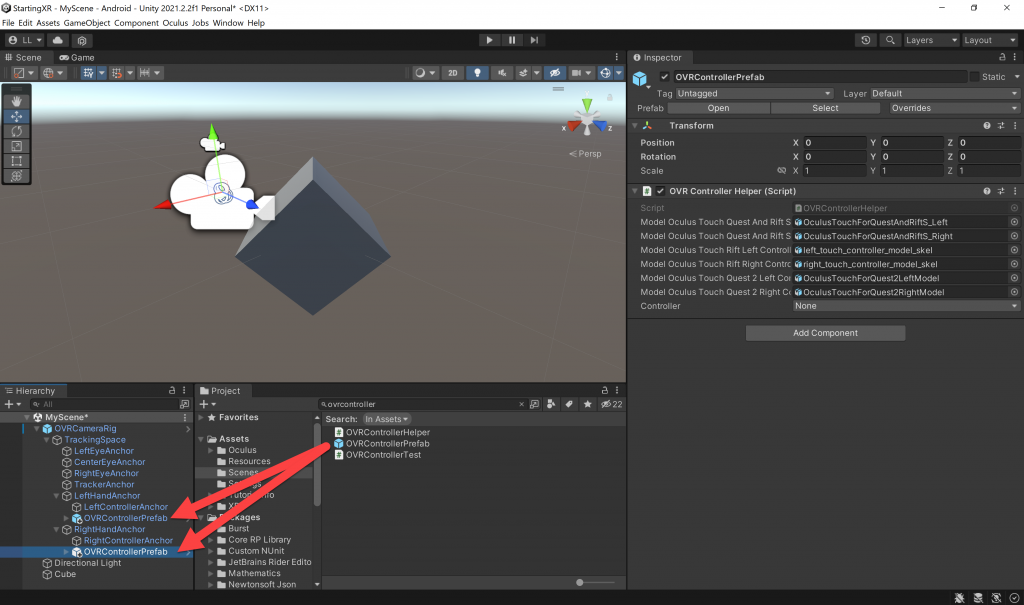
- (Project) Drag the OVRControllerPrefab to both the LeftHandAnchor and the RightHandAnchor
- (Hierarchy) OVRCameraRig -> TrackingSpace
- LeftHandAnchor -> Click the OVRControllerPrefab
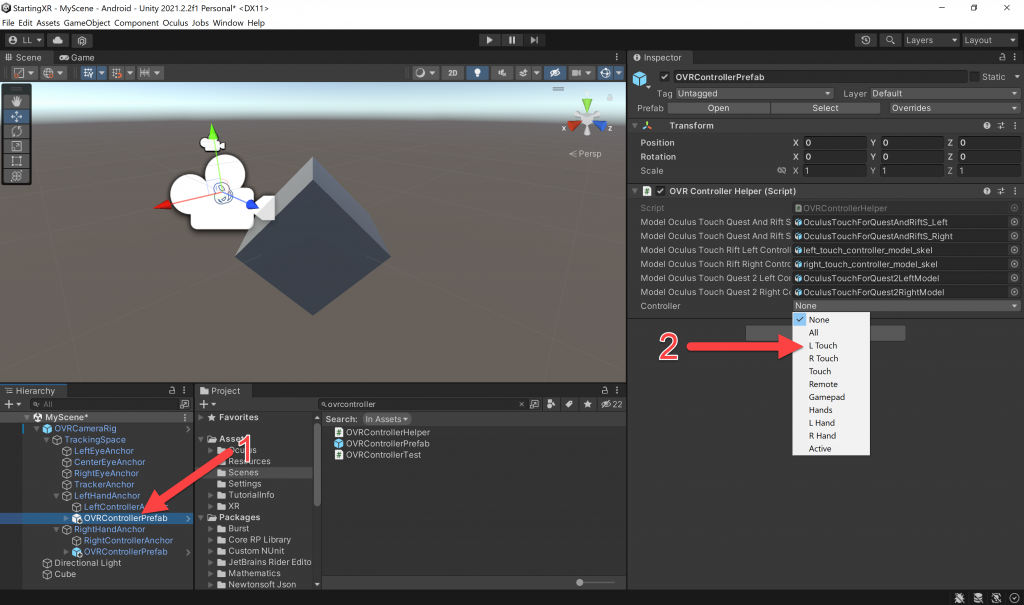
- (Inspector) OVR Controller Helper (Script) -> (Controller) Choose L Touch
- RightHandAnchor -> Click the OVRControllerPrefab
- (Inspector) OVR Controller Helper (Script) -> (Controller) Choose R Touch
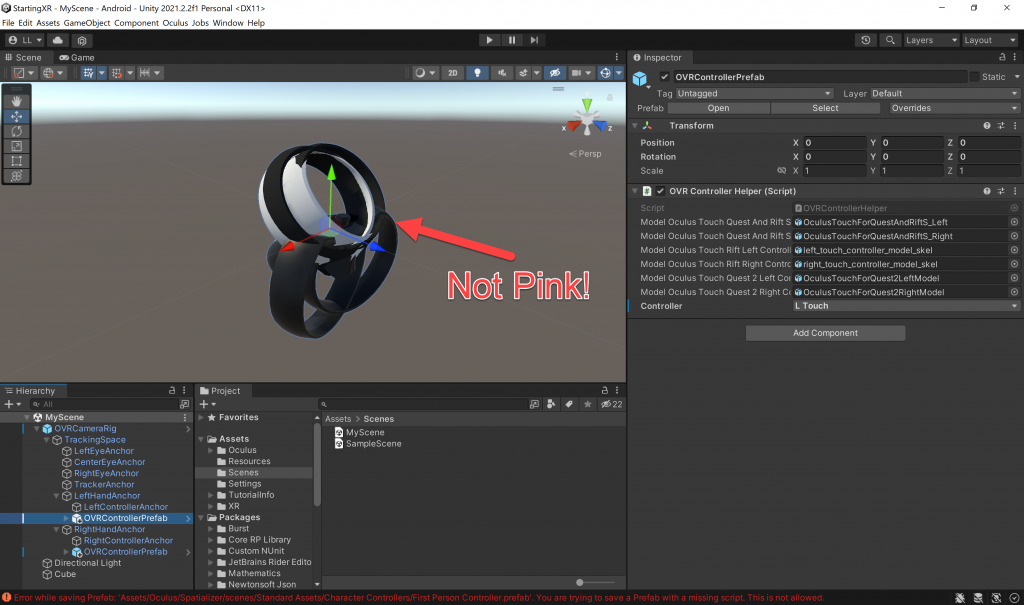
- LeftHandAnchor -> Double click OVRControllerPrefab – will see controllers! (sort of…)
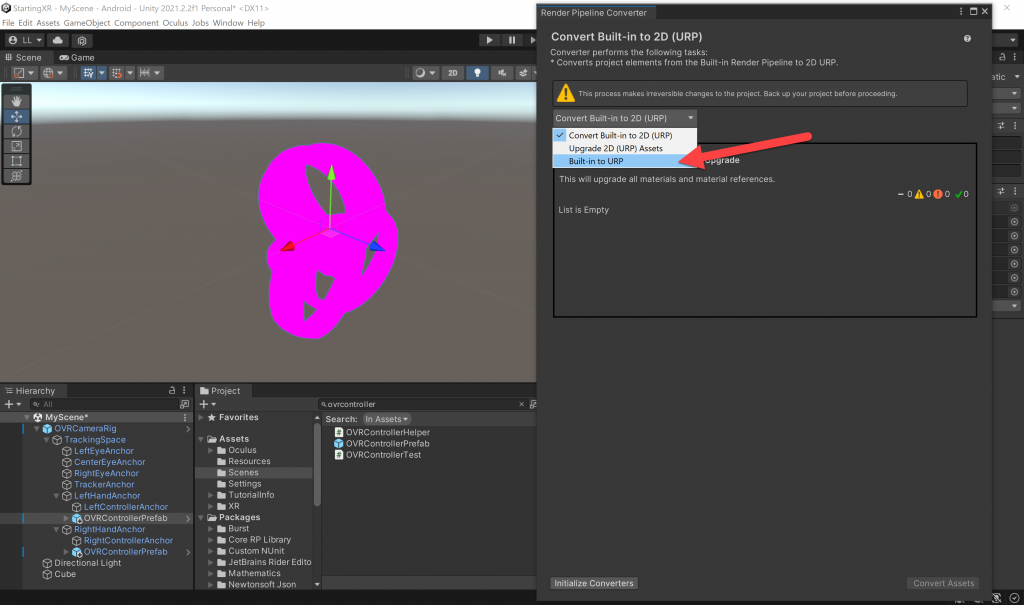
- (Toolbar) Window -> Rendering -> Render Pipeline Converter
- (Render Pipeline Converter)
- Choose Built-in to URL
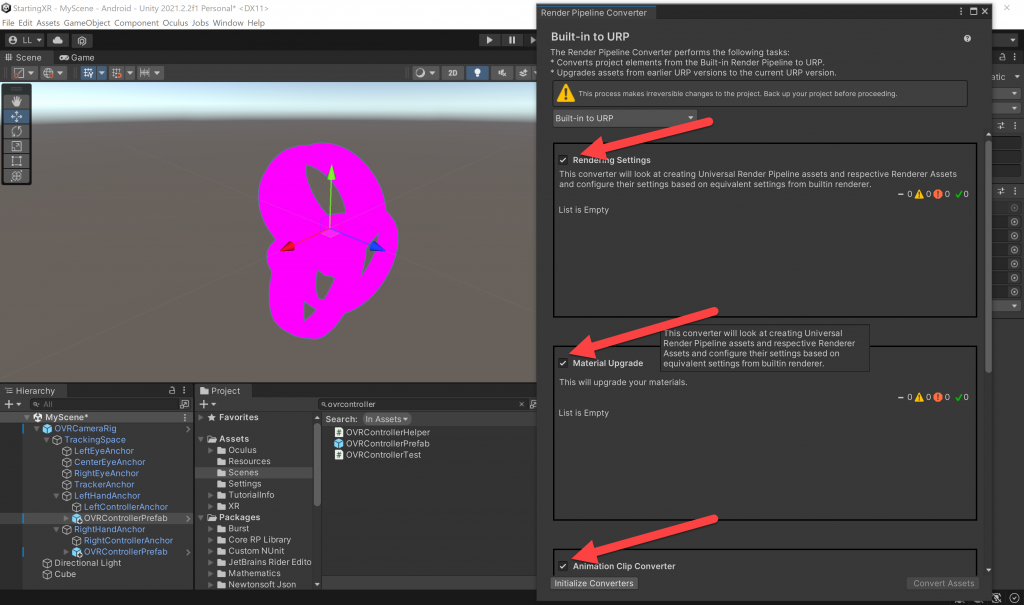
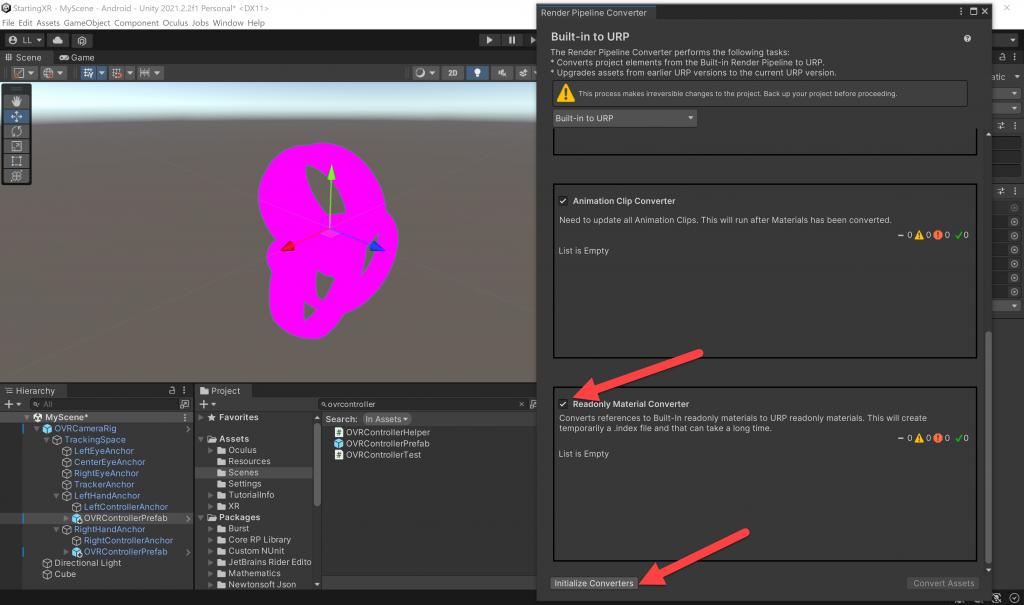
- Check Rendering Settings, Material Upgrade, Animation Clip Converter and Readonly Material Converter
- Click Initialize Converters
Full Step-by-Step Instructions!
- (Hierarchy) Click on OVRCameraRig -> expand to see LeftHandAnchor and RightHandAnchor
- (Project Search Bar) Type OVRControllerPrefab
- (Project) Drag the OVRControllerPrefab to both the LeftHandAnchor and the RightHandAnchor
- (Hierarchy) OVRCameraRig -> TrackingSpace
- LeftHandAnchor -> Click the OVRControllerPrefab
- (Inspector) OVR Controller Helper (Script) -> (Controller) Choose L Touch
- RightHandAnchor -> Click the OVRControllerPrefab
- (Inspector) OVR Controller Helper (Script) -> (Controller) Choose R Touch
- (Hierarchy) OVRCameraRig -> TrackingSpace
- LeftHandAnchor -> Double click OVRControllerPrefab – will see controllers! (sort of…)
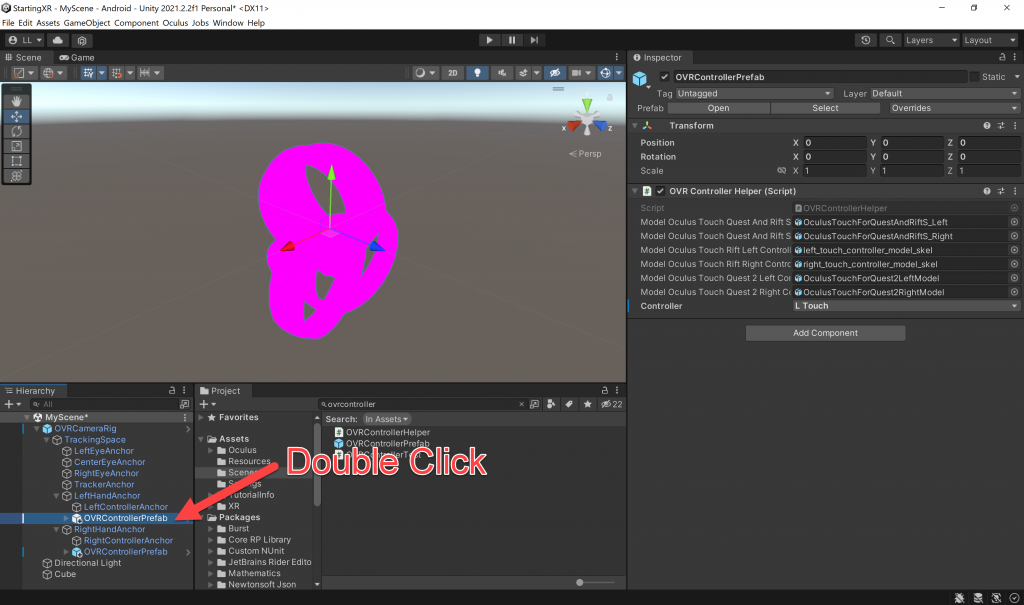
- Why are they pink?? Since we’re using a URP (Universal Render Pipeline) project type we need to convert the assets to show correctly in URP — easy once you know how — they’re pink because they’re not in the correct format.
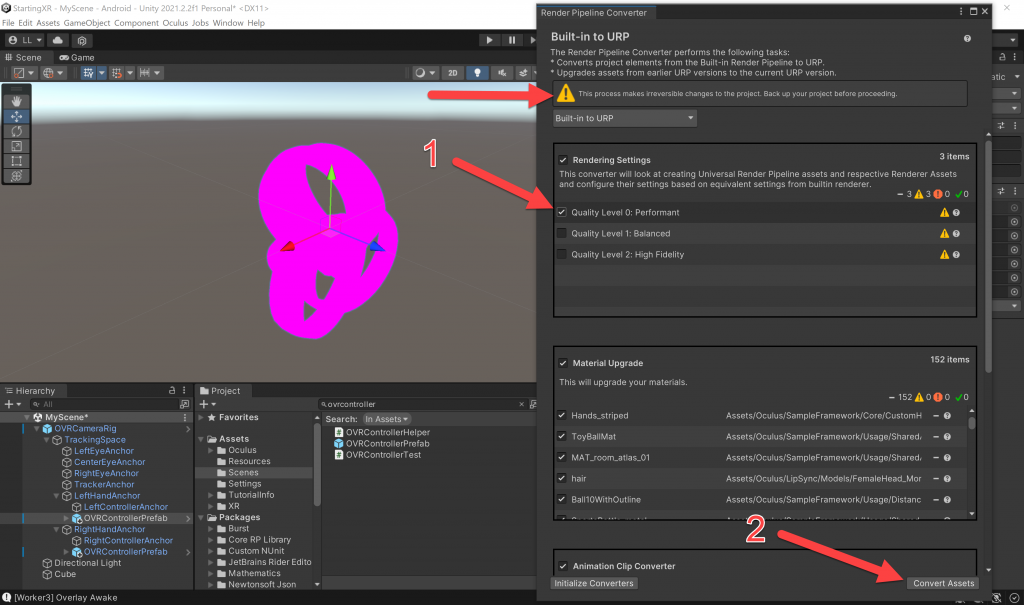
- (Toolbar) Window -> Rendering -> Render Pipeline Converter

- (Render Pipeline Converter) Choose Built-in to URL
- (Render Pipeline Convert)
- Check Rendering Settings, Material Upgrade, Animation Clip Converter and Readonly Material Converter
- Click Initialize Converters
- You see the warning This process makes irreversible changes to the project. Back up your project before proceeding. — this is easily done if you setup your GitHub code repository from my previous blog article <hint hint>
- (Render Pipeline Converter)
- (Render Settings) Check Quality Level 0: Performant
- Click Convert Assets
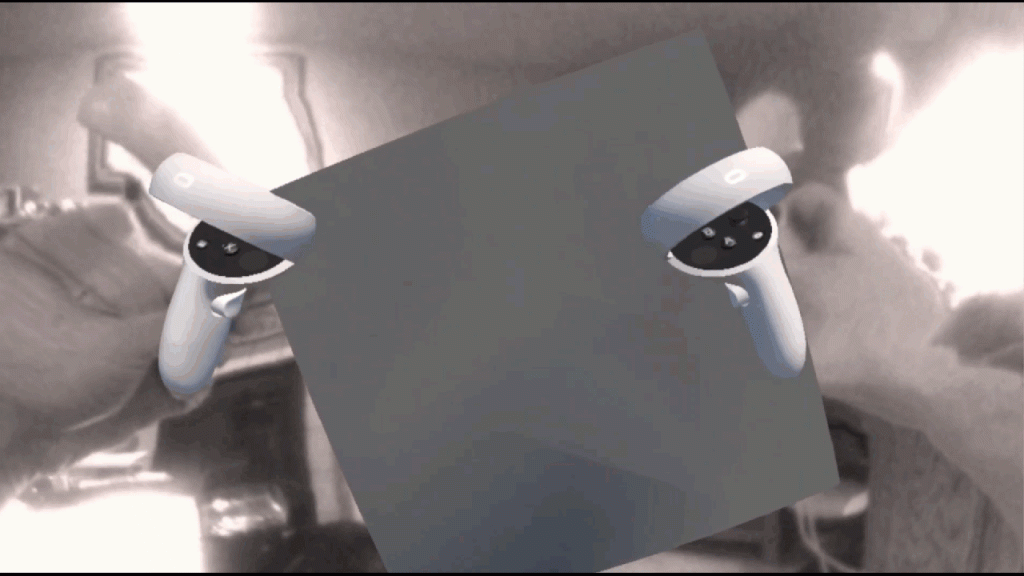
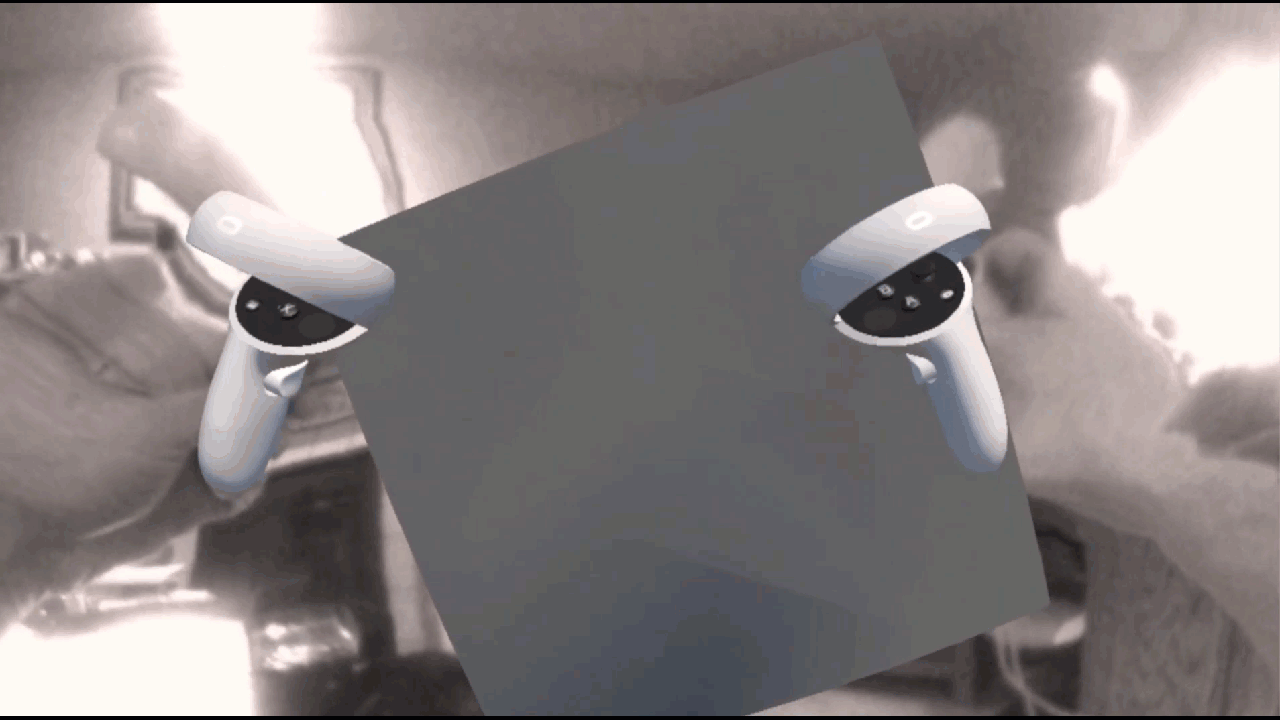
- Run your project and you should see beautiful controllers showing up — that are synchronized to the real controllers!
Love any feedback and see you in future XR blog posts.
Build something amazing in XR! — Lance
Here’s my XR Step-by-Step blog series to help you create your XR experiences!
1) Installing the Tools you need for XR development == Unity 2021
2) Setting up your Oculus Quest XR project in Unity 2021!
3) Setting up Mixed-Reality Passthrough for your Oculus Quest XR project in Unity 2021!
4) Keep your XR project safe with a GitHub Code Repo!
5) Setting up Touch Controller for your Oculus Quest XR project in Unity 2021!
6) Coding your Touch Controller for your Oculus Quest XR project in Unity 2021!

Really nice, good work!
Plus, thanks to you I learn about the Render Pipeline Converter process. It’s so helpful.
Keep going! (hand traking?)
(You have a typo : Choose Built-in to “URL” instead of UPR)
Non so come ringraziarti per il tuo magnifico lavoro
Grazie mille dall’Italia!
Fantastica guida!
Domenico
automatic translation
I don’t know how to thank you for your wonderful work
Thank you very much from Italy!
Fantastic guide!