Virtual and Augmented Reality together are now referred to as XR or “Extended-Reality”. You’re in the right place at the right time to build something amazing in XR!
XR applications can be created in Unity for many devices, our focus will be on Microsoft Hololens and the Oculus Quest 2 – in this blog post series we will specifically focus on Oculus Quest 2 in the latest Unity 2021.
What is Passthrough? Passthrough allows us to see the real world around us -AND- place holograms there too! Passthrough is the beginning of something powerful and beautiful for our XR experiences!
Here’s my XR Step-by-Step blog series to help you create your XR experiences!
1) Installing the Tools you need for XR development == Unity 2021
2) Setting up your Oculus Quest XR project in Unity 2021!
3) Setting up Mixed-Reality Passthrough for your Oculus Quest XR project in Unity 2021!
4) Keep your XR project safe with a GitHub Code Repo!
5) Setting up Touch Controller for your Oculus Quest XR project in Unity 2021!
6) Coding your Touch Controller for your Oculus Quest XR project in Unity 2021!
Quick Reference summary of all steps to setup your XR project -AND- add Passthrough, followed by the detailed Step-by-Step with images! Specific Passthrough steps are highlighted in blue.
- (Template) 3D URP -> Create
- *(Toolbar) Window -> Layouts -> Wide (*optional)
- (Project Window) Right-click -> Create -> Scene
- (Hierarchy Window) Right-click on the Main Camera -> Delete
- (Toolbar) File -> Build Settings
- (Build Settings) Add Open Scenes -> Check/Uncheck Scenes
- (Build Settings) Platform -> Android -> Switch Platform
- (Toolbar) Edit -> Project Settings…
- (Project Settings) Player -> Change Company Name
- (Project Settings) Player -> Other Settings -> Color Space should be Linear -> Delete OpenGLES2 (Depreciated)
- (Project Settings) Player -> under Configuration
- Change Scripting Backend to IL2CPP
- Uncheck Target Architectures -> ARMv7
- Check Target Architectures -> ARM64
- (Project Settings) XR Plug-in Management -> Install XR Plugin Management button
- (Project Settings) XR Plug-in Management -> Check the Oculus option under the Android + Windows tab
- (Toolbar) Window -> Package Manager
- (Package Manager) Switch from Packages: In Project -> Packages: My Assets
- (Package Manager) Click Oculus Integration -> Import (Answer Yes, Ok, etc)
- (Project Window Search Bar) Search for OVRCameraRig -> Drag OVRCameraRig Prefab into scene
- (Hierarchy) Click on OVRCameraRig
- (Inspector Window) Under OVR Manager (Script)
- (Tracking) Tracking Origin Type -> Floor Level
- (Quest Features – General) check Passthrough Capability Enabled, then check Enable Passthrough
- (Inspector Window) Click Add Component button -> Search for and add OVR Passthrough Layer
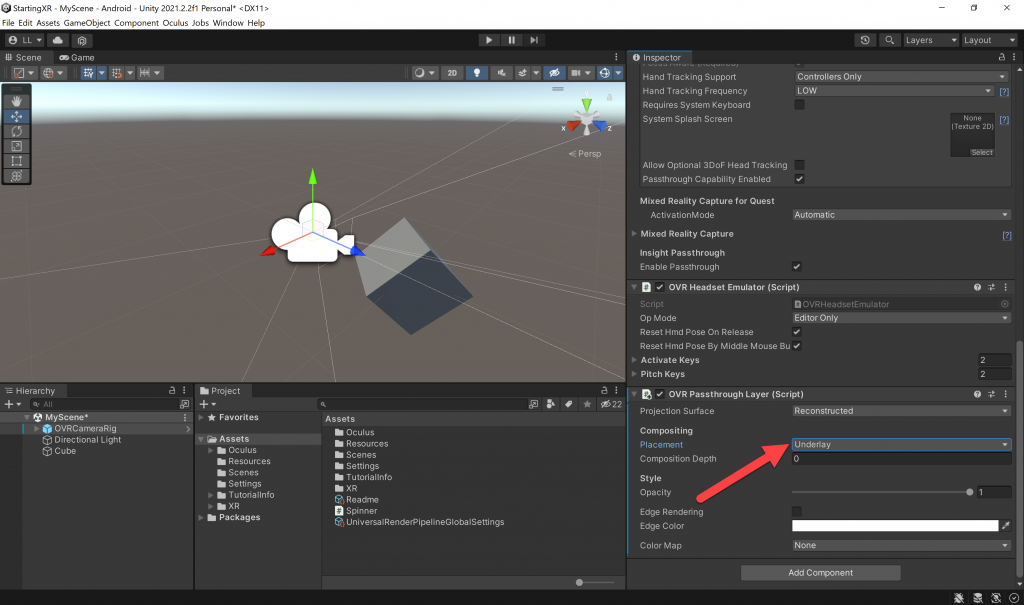
- (Inspector Panel) OVR Passthrough Layer (Script) -> Change Placement to Underlay
- (Inspector Window) Under OVR Manager (Script)
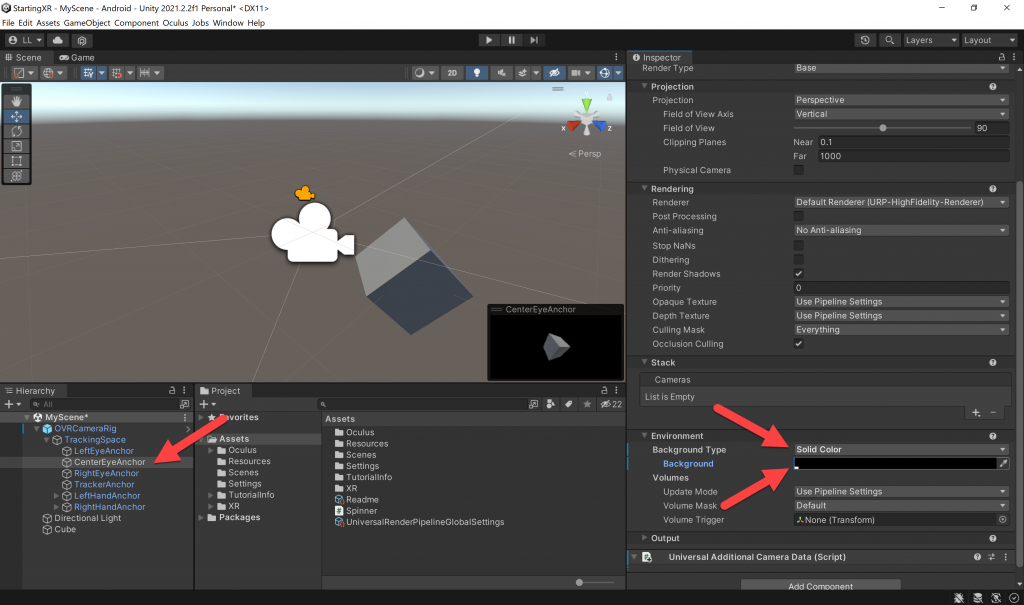
- (Hierarchy Window) Expand OVRCameraRig -> expand TrackingSpace -> click on CenterEyeAnchor
- (Inspector Window) Under Environment -> change Background Type to Solid Color -> Set Background to Black
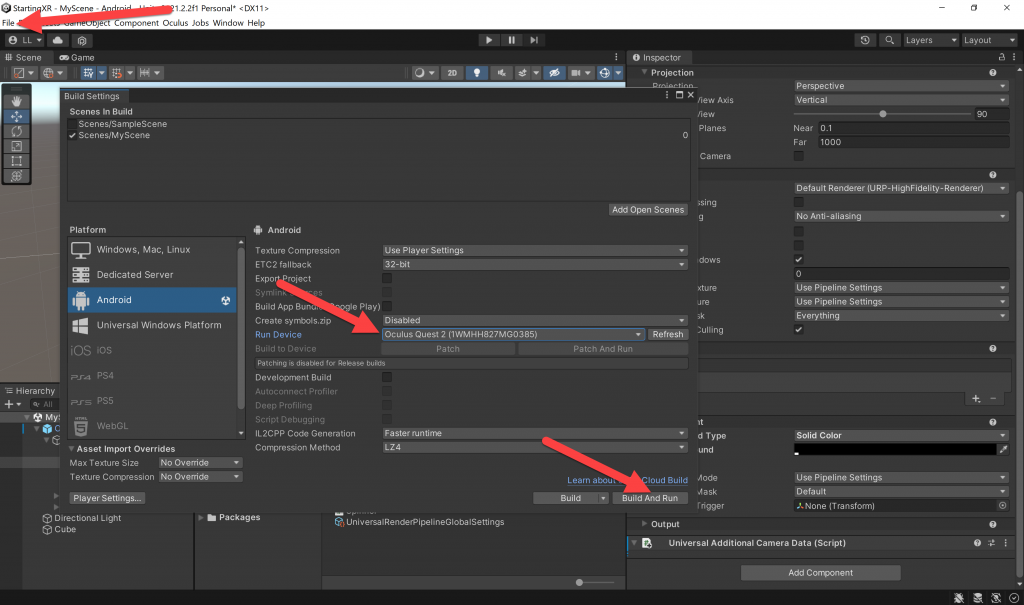
- (Toolbar) File -> Build Settings…
- (Build Settings) Run Device -> choose Quest device -> Click Build and Run button
- (Build Android) File Name -> name it Install -> Click Save
Full Step-by-Step Instructions!
- (Toolbar) Edit -> Project Settings
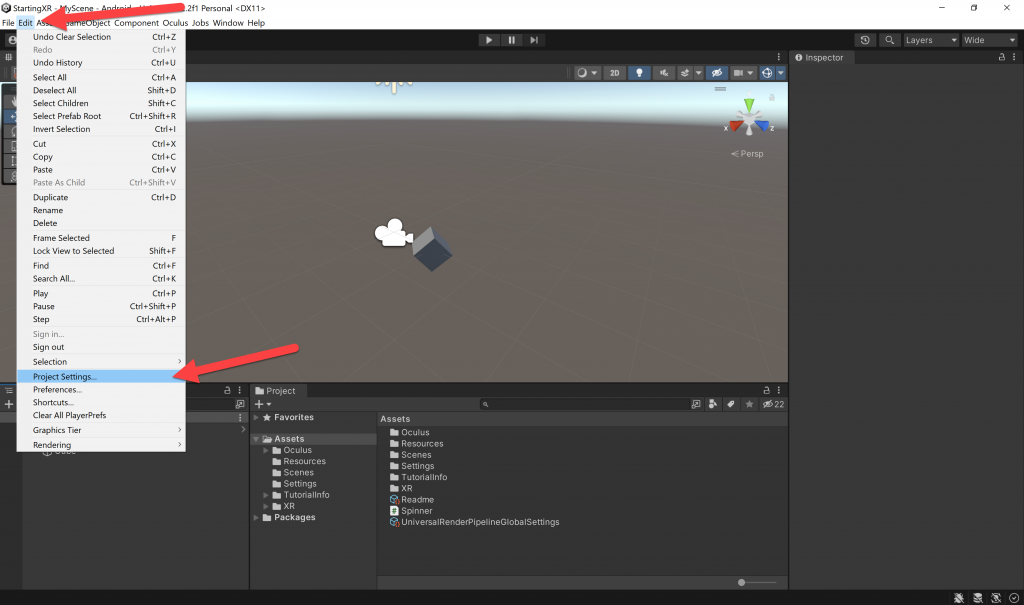
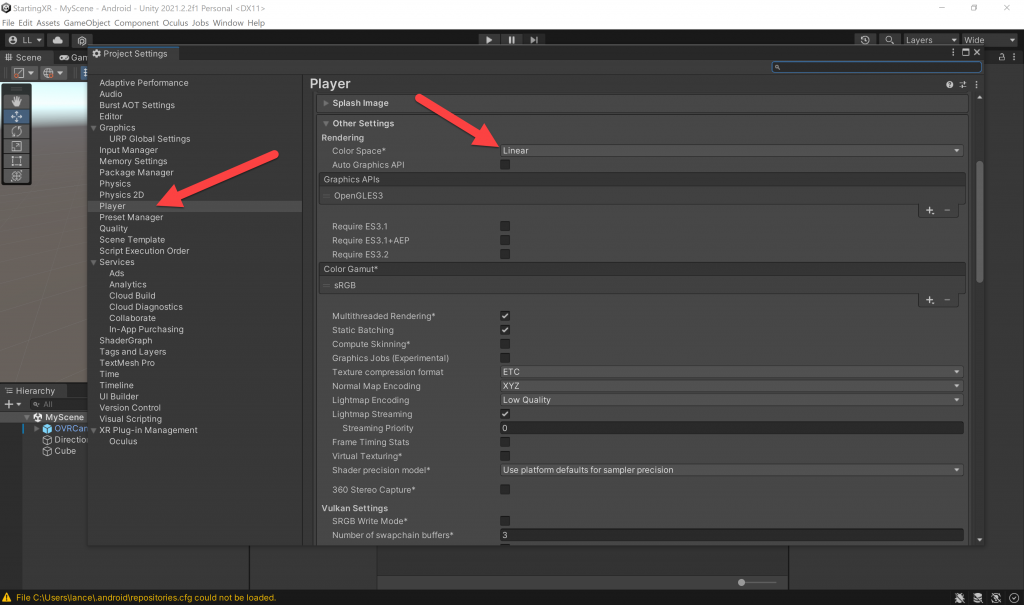
(Project Settings) Player -> under Other Settings confirm that the Color Space is set to Linear (it should already be)
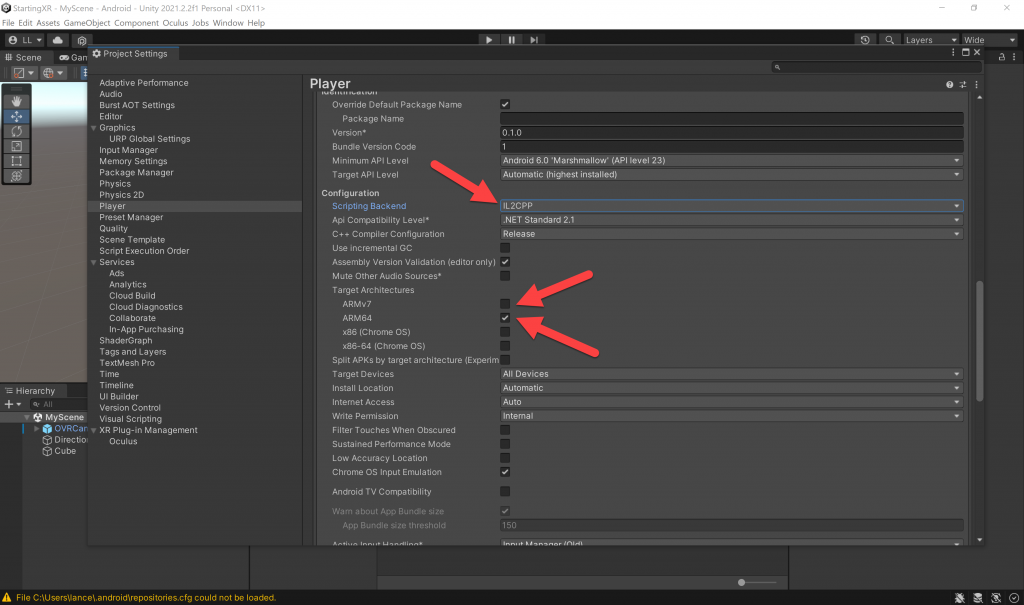
- (Project Settings) Player -> under Configuration
- Change Scripting Backend to IL2CPP
- Uncheck Target Architectures -> ARMv7
- Check Target Architectures -> ARM64
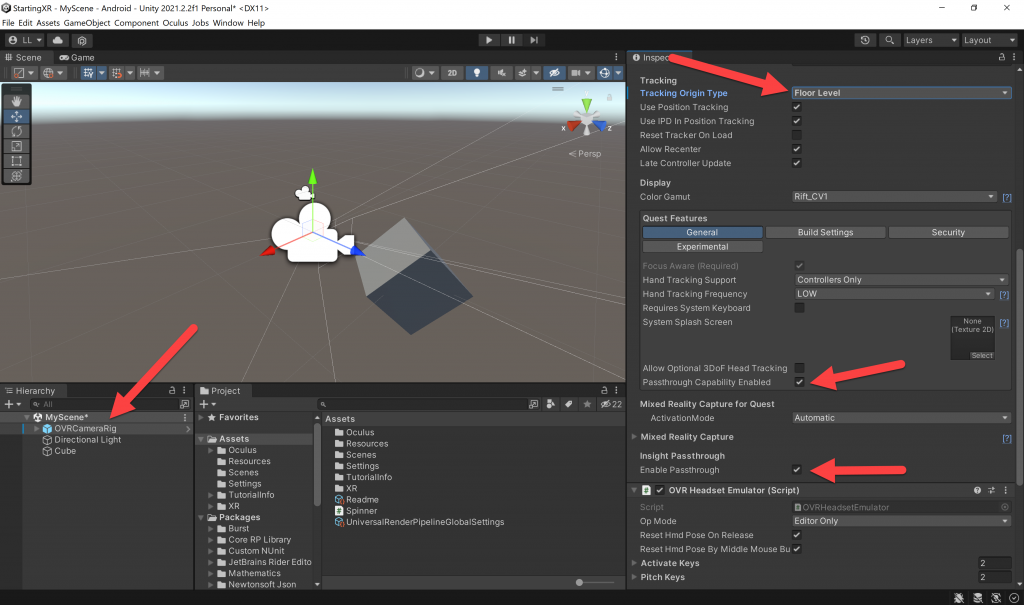
- (Hierarchy) Click on OVRCameraRig
- (Inspector Window) Under OVR Manager (Script)
- (Tracking) Tracking Origin Type -> Floor Level
- (Quest Features – General) check Passthrough Capability Enabled, then check Enable Passthrough
- (Inspector Window) Click Add Component button
- (Add Component) Search for and add OVR Passthrough Layer
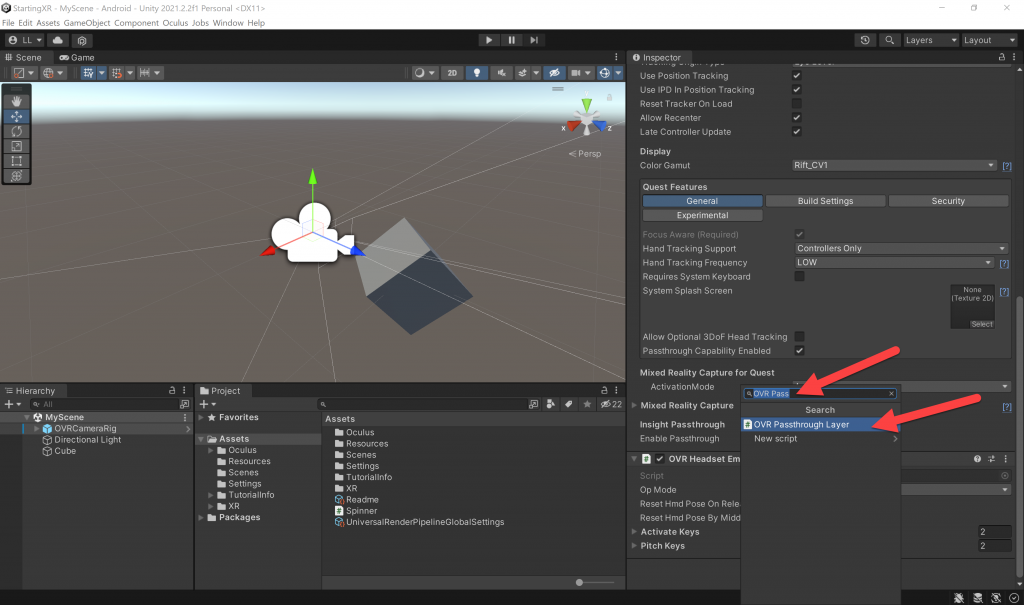
- (Inspector Panel) OVR Passthrough Layer (Script) -> Change Placement to Underlay
- Note: What are these settings?
- Placement: “Overlay” puts the passthrough in the foreground, and “Underlay” sets it as the background so your users can see the real-world (in black-and-white) — when the Quest gets color cameras, we’ll be able to see in full color.
- Opacity: Sets the passthrough as transparency, so you can make it darker for example.
- Edge Rendering: Underline the edges of the image — can be used in conjunction with color map below to make some very engaging visuals.
- Color Map: Can colorize the black-and-white passthrough video — again, very interesting possibilities.
- (Hierarchy Window) Expand OVRCameraRig -> expand TrackingSpace -> click on CenterEyeAnchor
- (Inspector Window) Under Environment -> change Background Type to Solid Color -> Set Background to Black
- As in previous blog post -> (Toolbar) File -> Build Settings -> set your Run Device -> click Build and Run
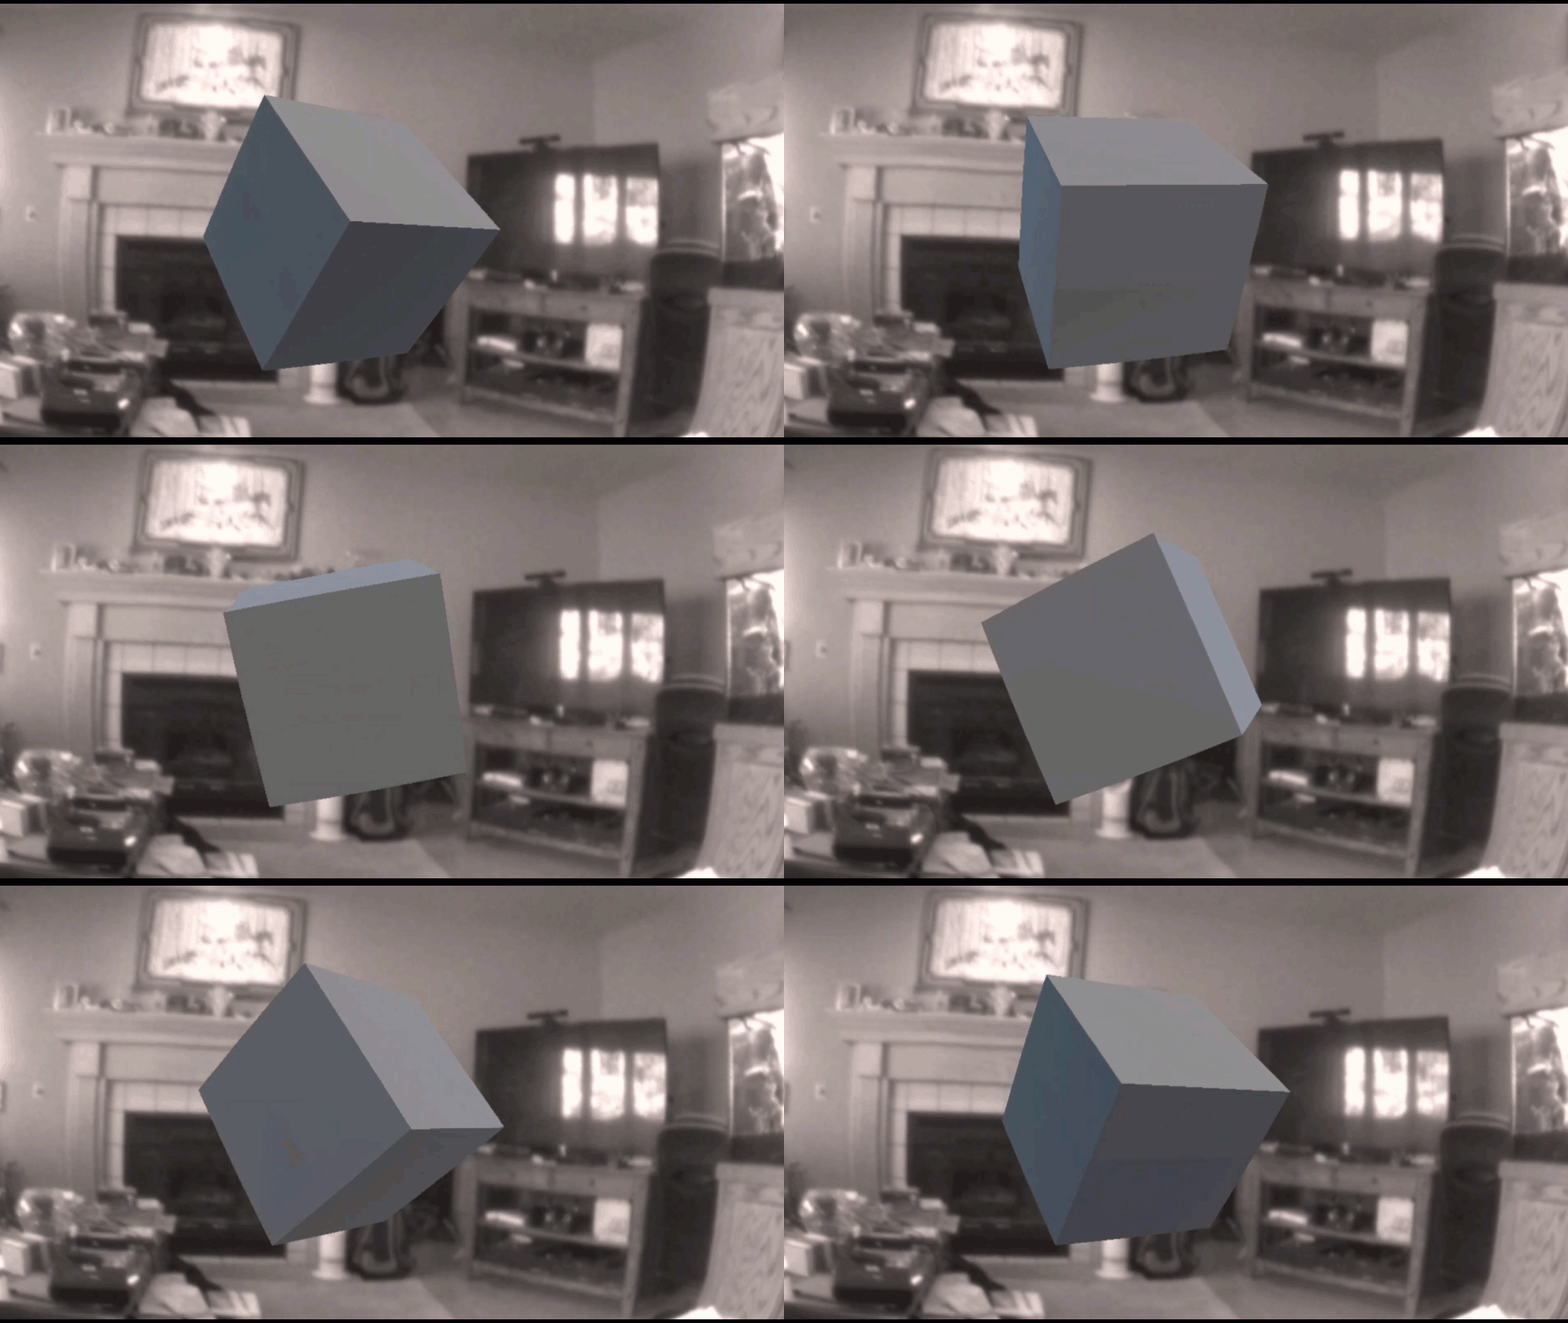
- That’s it! You should now see a rotating cube in your XR experience on your Quest -AND- be able to see the world around you! A true Mixed Reality experience!!!
Love any feedback and see you in future XR blog posts.
Build something amazing in XR! — Lance
Here’s my XR Step-by-Step blog series to help you create your XR experiences!
1) Installing the Tools you need for XR development == Unity 2021
2) Setting up your Oculus Quest XR project in Unity 2021!
3) Setting up Mixed-Reality Passthrough for your Oculus Quest XR project in Unity 2021!
4) Keep your XR project safe with a GitHub Code Repo!
5) Setting up Touch Controller for your Oculus Quest XR project in Unity 2021!
6) Coding your Touch Controller for your Oculus Quest XR project in Unity 2021!


For some reason the passthrough still doesnt work! Im using the new Meta Quest Pro and I cant see the passthrough even on the sample scenes from the Oculus Integration Package. Might this be something that has to do with the Meta Quest Pro Device?