
Virtual and Augmented Reality together are now referred to as XR or “Extended-Reality”. You’re in the right place at the right time to build something amazing in XR!
XR applications can be created in Unity for many devices, our focus will be on Microsoft Hololens and the Oculus Quest 2 – in this blog post series we will specifically focus on Hololens 2 in the latest Unity 2021.
Welcome! I love the Hololens and what real-world problems it can be used to solve by bringing computational vision to industries that have not had anything like this before…
But we need to get more developers working and comfortable with the tools — so together we’ll be doing that.
Now that we have our tools installed and configured (see Installing the Tools you need for Hololens 2! Unity 2021 + MRTK 2.7 + Visual Studio 2022) we’ll setup our project!
Pretty easy with a road-map on what you need to do (which I aim to provide to you!) but non-trivial by far without a good set of instructions. Especially if you want to use the latest versions of all our awesome tools!
Here’s my XR Step-by-Step blog series for the Hololens 2 to help you create your XR experiences!
1) Installing the Tools you need for XR development == Unity 2021
2) Installing the Tools you need for Hololens 2! Unity 2021 + MRTK 2.7 + Visual Studio 2022
3) Setting up your Hololens 2 Project in Unity 2021 + MRTK 2.7 + Visual Studio 2022
4) Low Latency Hololens Streaming (<1s)
Quick Reference summary of all steps to setup your Hololens 2 XR project, followed by the detailed Step-by-Step with images!
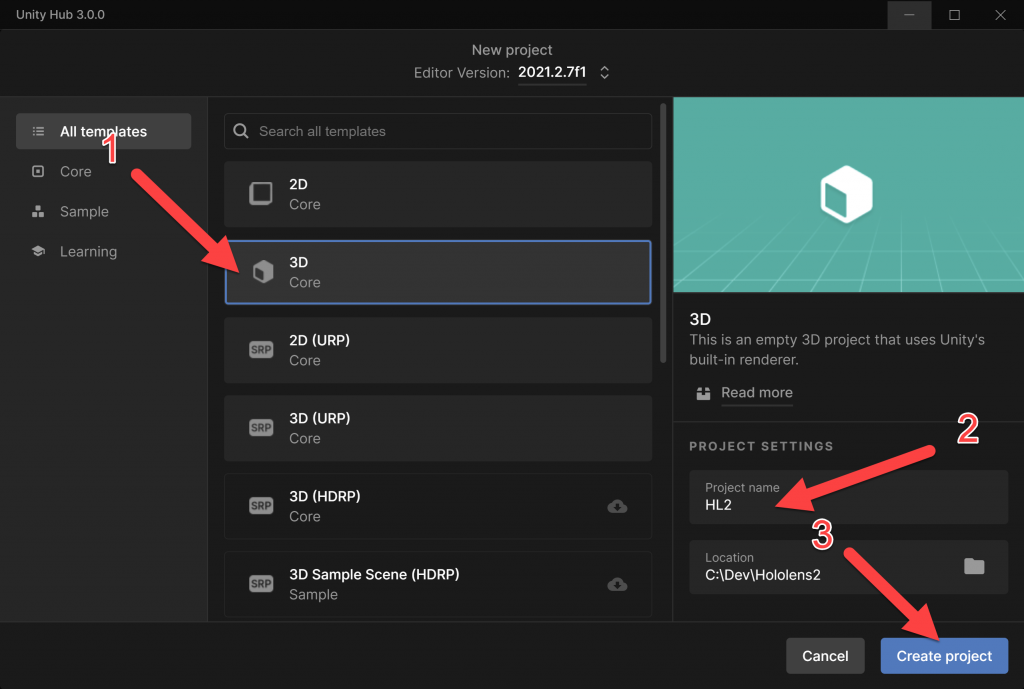
- (Unity Hub) Click New Project -> 3D template -> name your project -> Click Create Project
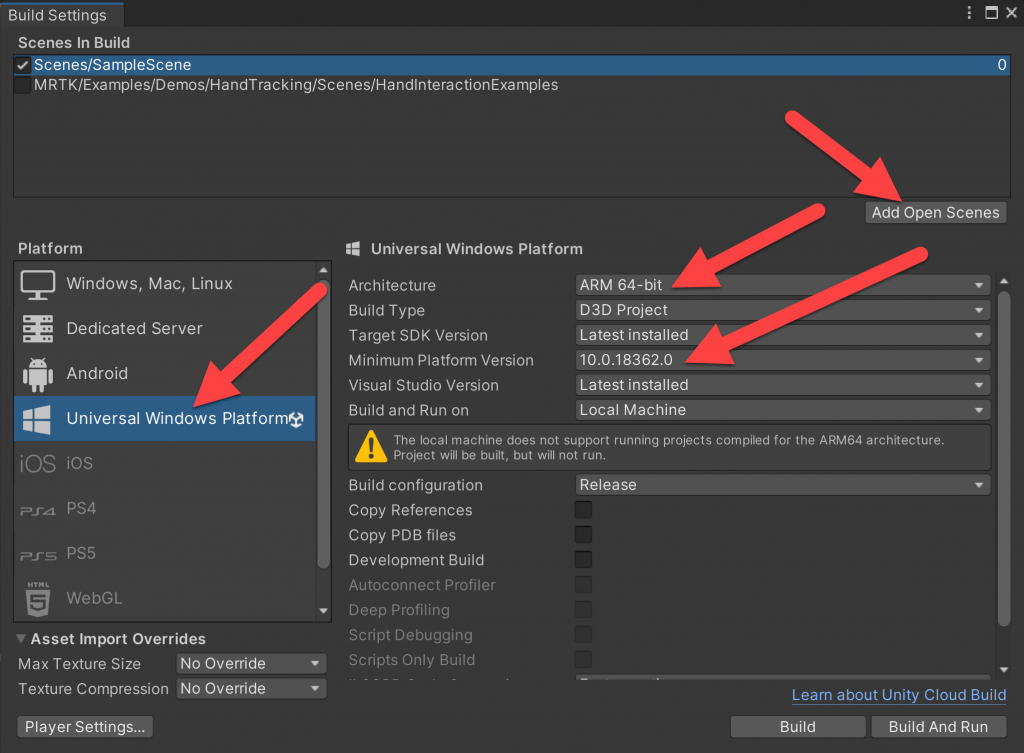
- (Toolbar) File -> Build Settings…
- Add Open Scenes
- Switch Platform to Universal Windows Platform
- Architecture -> ARM 64-bit
- Minimum Platform Version -> 10.0.18362.0 (or newer)
- (Mixed Reality Feature Tool) Expand Platform Support -> Add Mixed Reality OpenXR Plugin to project
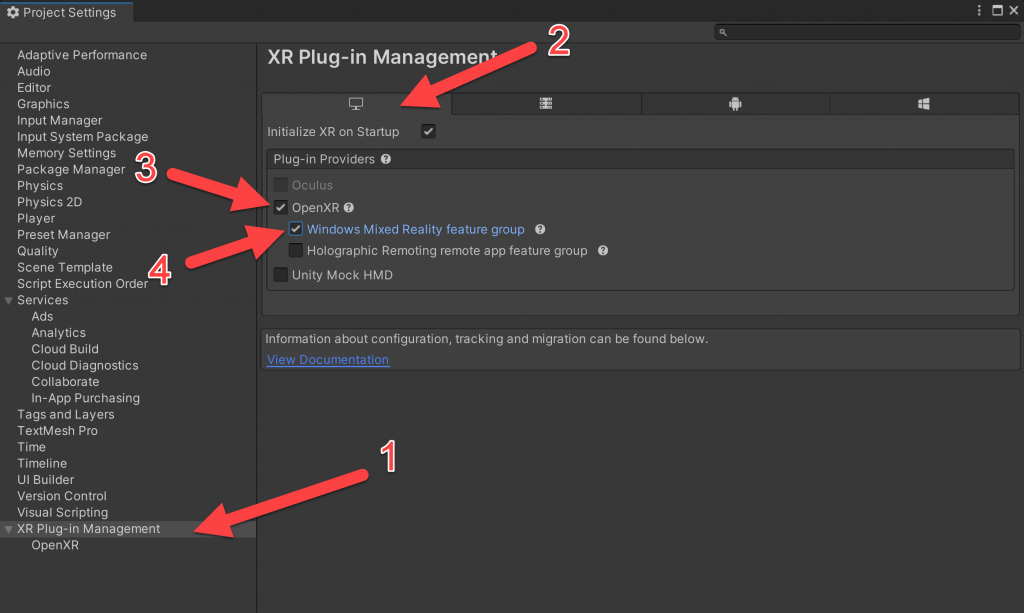
- (Toolbar) Edit -> Project Settings
- (Project Settings) Select XR Plug-in Management -> Click on the UWP Settings tab
- (UWP Settings) Check OpenXR -> Check Microsoft HoloLens feature group
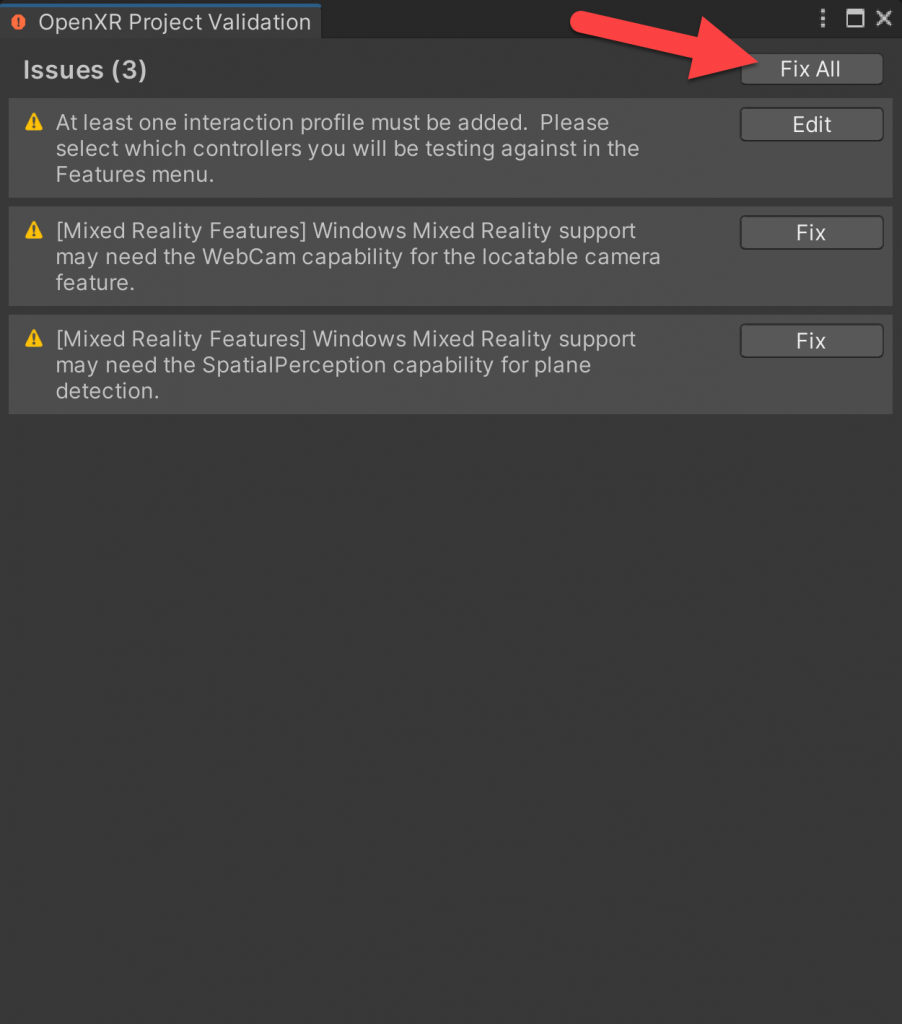
- (UWP Settings) Next to OpenXR -> Click the Warning Icon -> Click Fix All
- If you’re left with “At least one interaction profile must be added.” -> Click on Edit
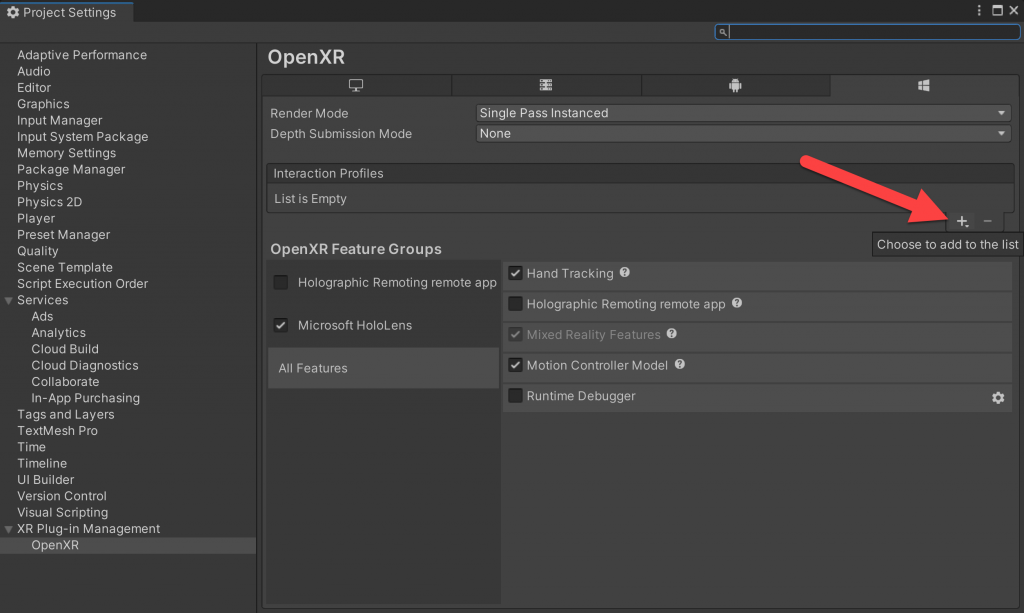
- (Project Settings) OpenXR -> Interaction Profiles -> Click “+“
- Add Eye Gaze Interaction Profile
- Click the Warning Icon -> Click Fix All
- Add Microsoft Hand Interaction Profile
- Add Eye Gaze Interaction Profile
- (Windows Settings) Check OpenXR -> Check Microsoft HoloLens feature group
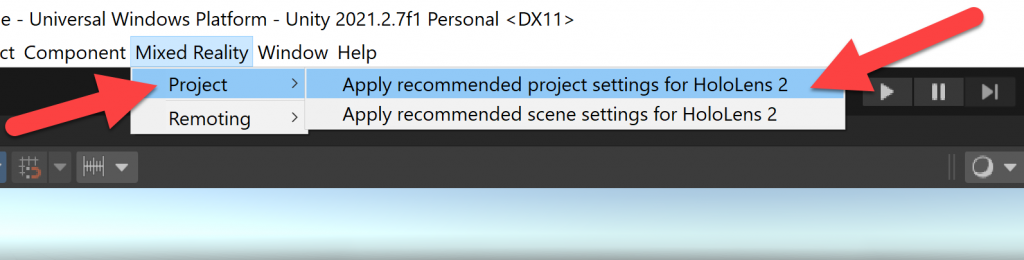
- (Toolbar) Mixed Reality -> Project -> Apply recommended project settings for HoloLens 2
- (Project) Select Assets -> Drag the unity packages into the Project window one at a time -> Click Import for each
- [Required] Microsoft.MixedReality.Toolkit.Unity.Foundation.2.7.2.unitypackage
- [Recommended] Microsoft.MixedReality.Toolkit.Unity.Tools.2.7.2.unitypackage
- [Optional] Microsoft.MixedReality.Toolkit.Unity.Examples.2.7.2.unitypackage
- [Optional] Microsoft.MixedReality.Toolkit.Unity.Extensions.2.7.2.unitypackage
- [Optional] Microsoft.MixedReality.Toolkit.Unity.TestUtilities.2.7.2.unitypackage
- (MRTK Project Configurator) Click Apply Settings -> Click Next -> Click Apply -> Click Apply
- (Hierarchy) Select your scene -> (Toolbar) Mixed Reality -> Toolkit -> Add to Scene and Configure…
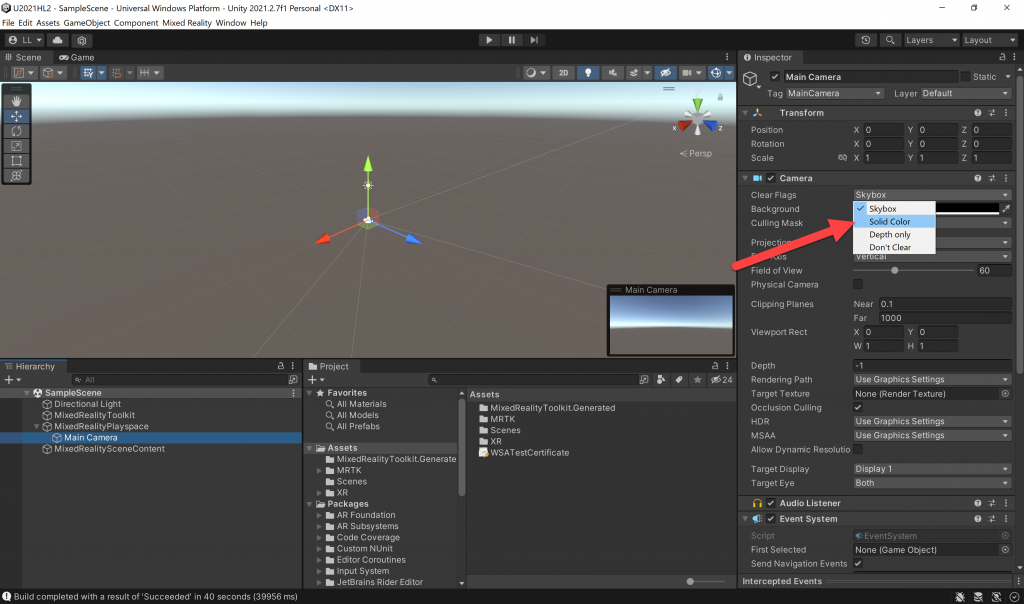
- (Hierarchy) Expand MixedRealityPlayspace -> Main Camera -> (Inspector) Camera -> Change Background to Solid Color -> Set to black
- [Optional] Add a cube or something to your scene for verification that your project works as expected 🙂
- (Toolbar) File -> Build Settings… -> Build
- (Windows Explorer) Click on the *.sln file in your Install folder (if you named it that)
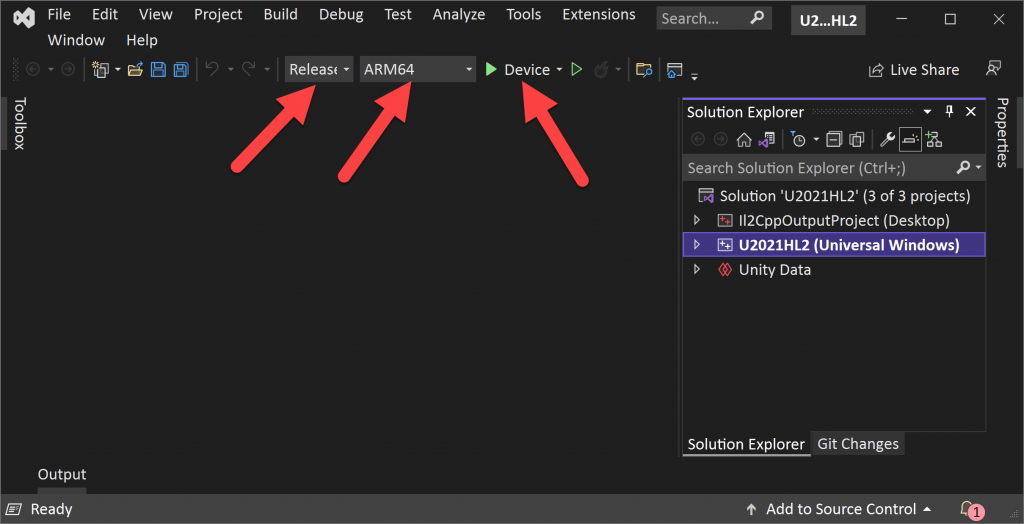
- (Visual Studio) Change to Release -> Change to ARM64 -> Change to Device -> Click on Device to deploy (make sure to have your Hololens 2 connected to your computer)
Full Step-by-Step Instructions!
- (Unity Hub) Click New Project -> 3D template -> name your project -> Click Create Project
- (Toolbar) File -> Build Settings…
- Add Open Scenes
- Switch Platform to Universal Windows Platform
- Architecture -> ARM 64-bit
- Minimum Platform Version -> 10.0.18362.0 (or newer) — if you don’t see this version, then you need to update your Windows SDK see previous blog post
- Open the folder where you unzipped your Mixed Reality Feature Tool
- Click on the MixedRealityFeatureTool.exe
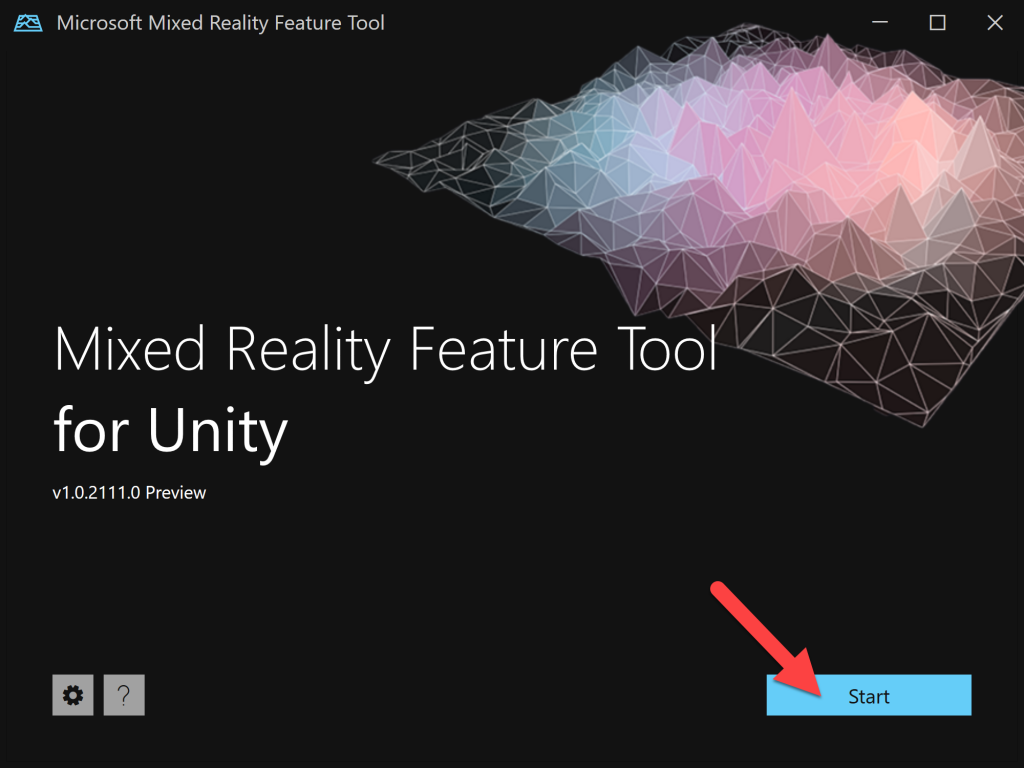
- Click Start
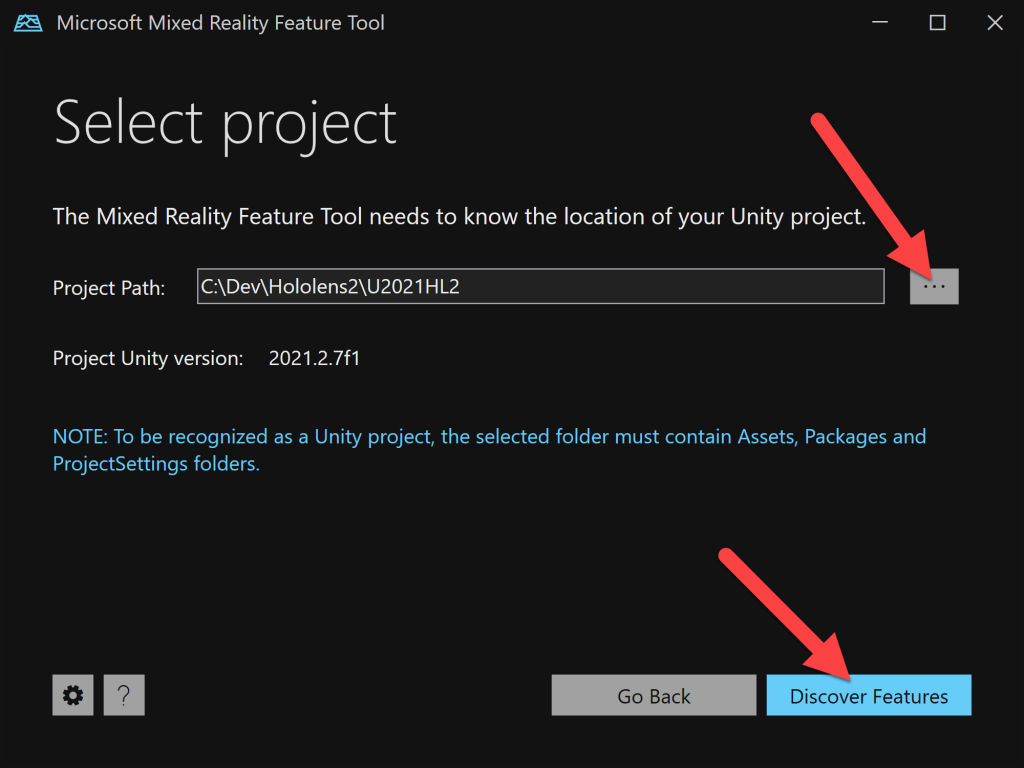
- Navigate to the folder for your Unity project -> Click Discover Features
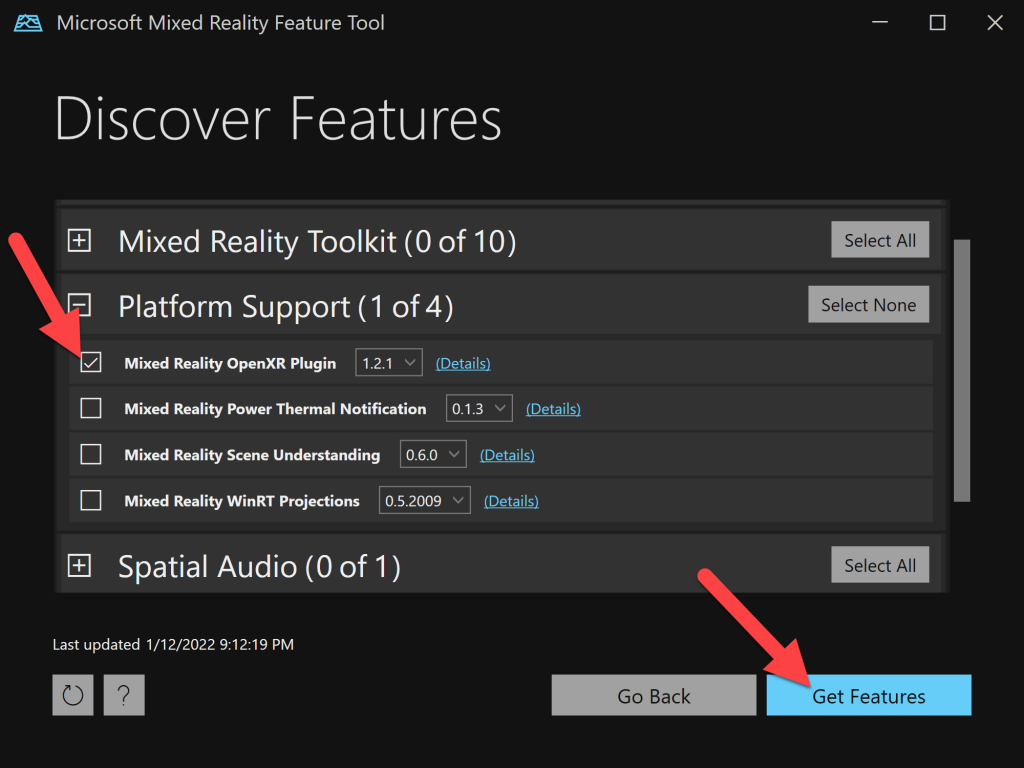
- (Mixed Reality Feature Tool) Expand Platform Support -> Check Mixed Reality OpenXR Plugin -> Click Get Features
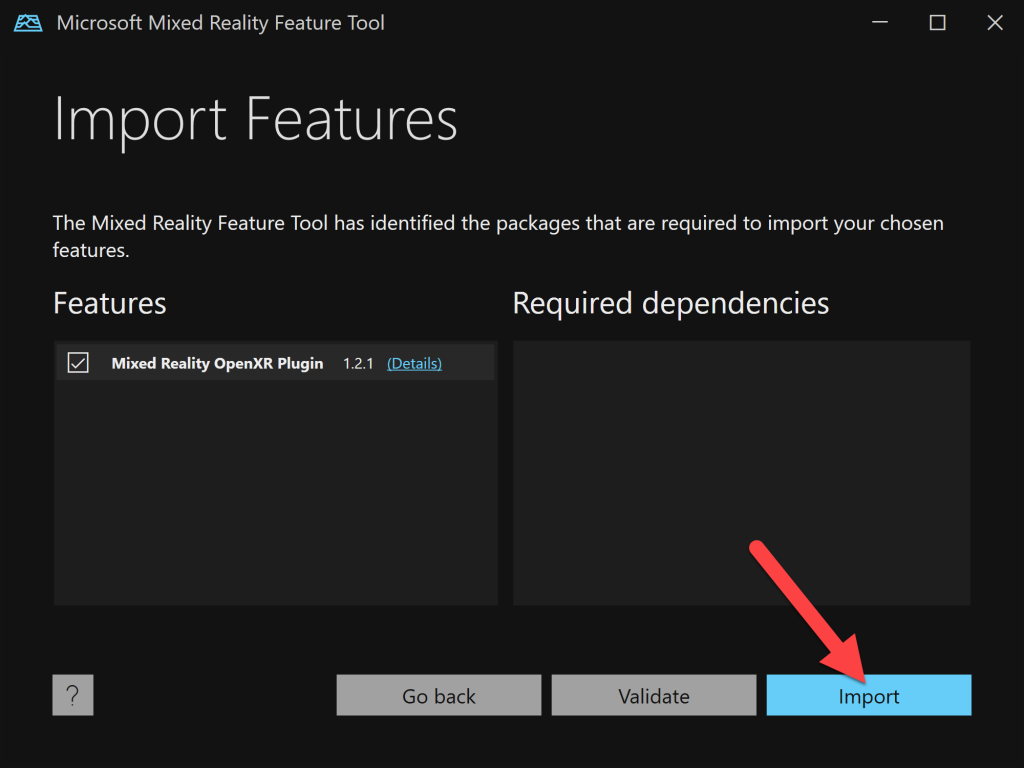
- Click Import
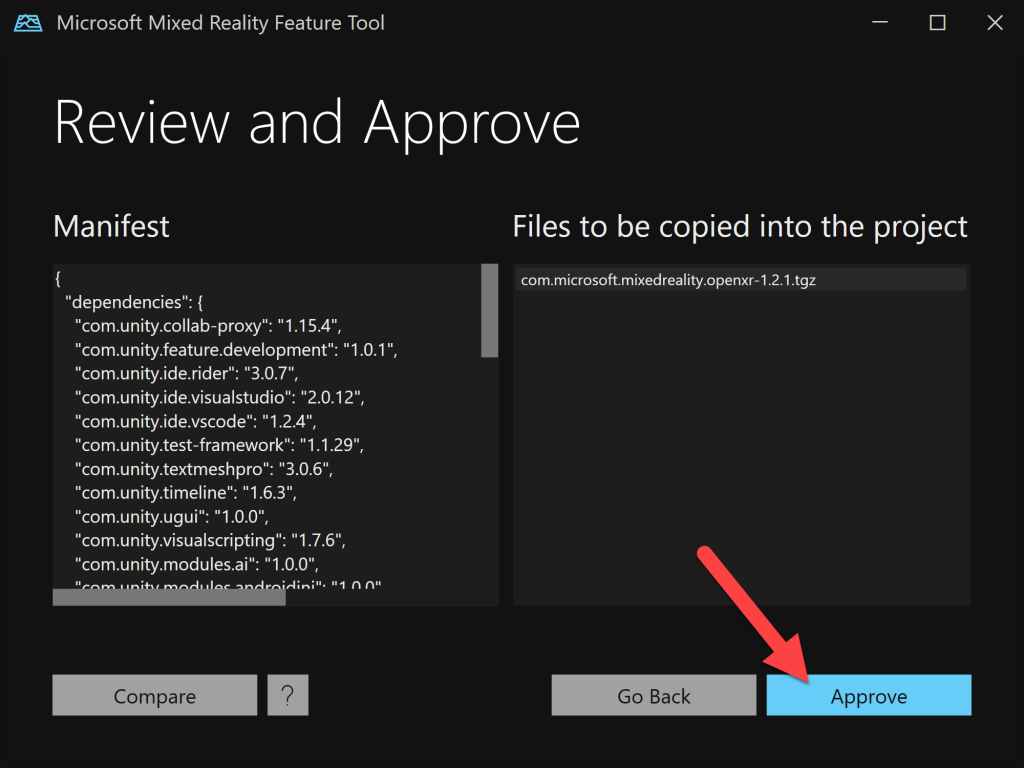
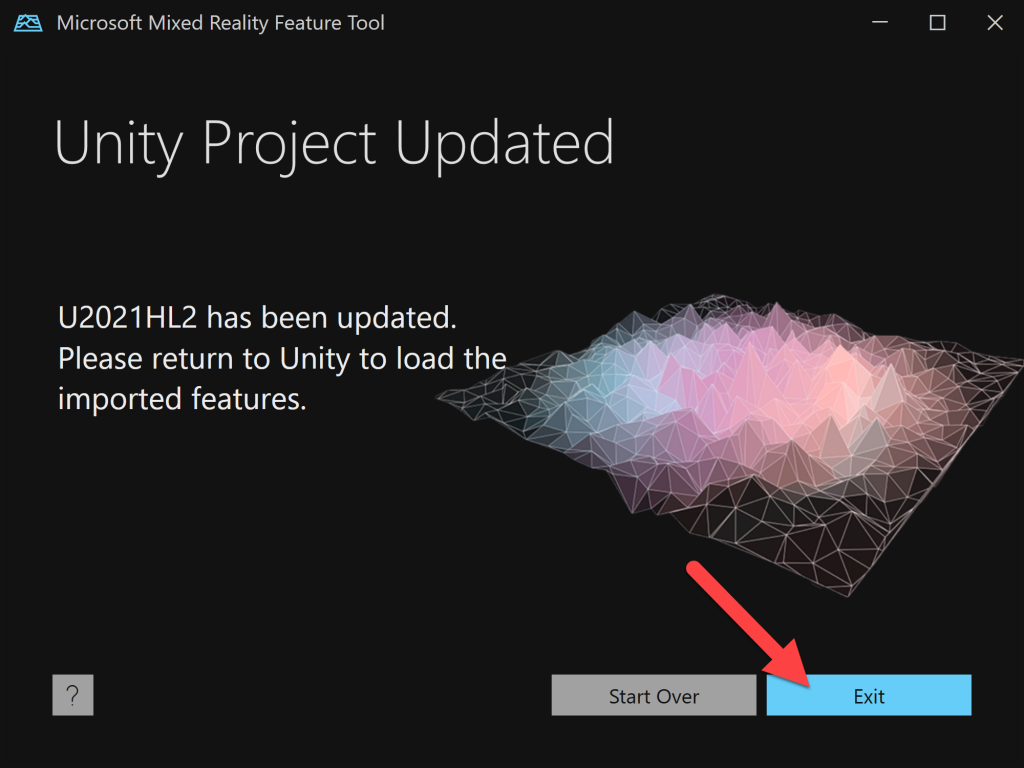
- Click Approve
- Click Exit
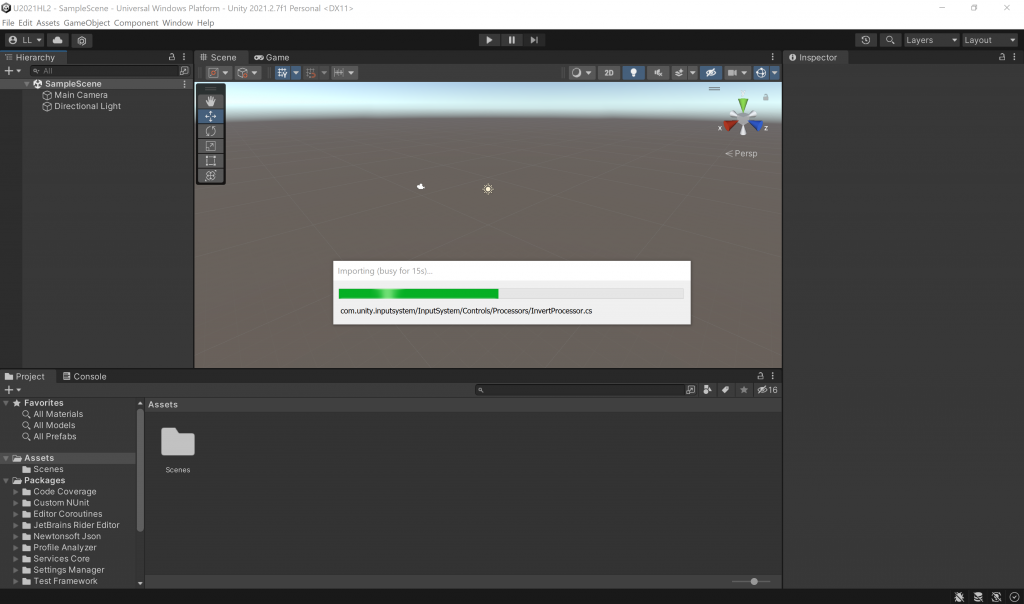
- Switch back to your Unity project – you will see that it’s importing the Mixed Reality OpenXR Plugin
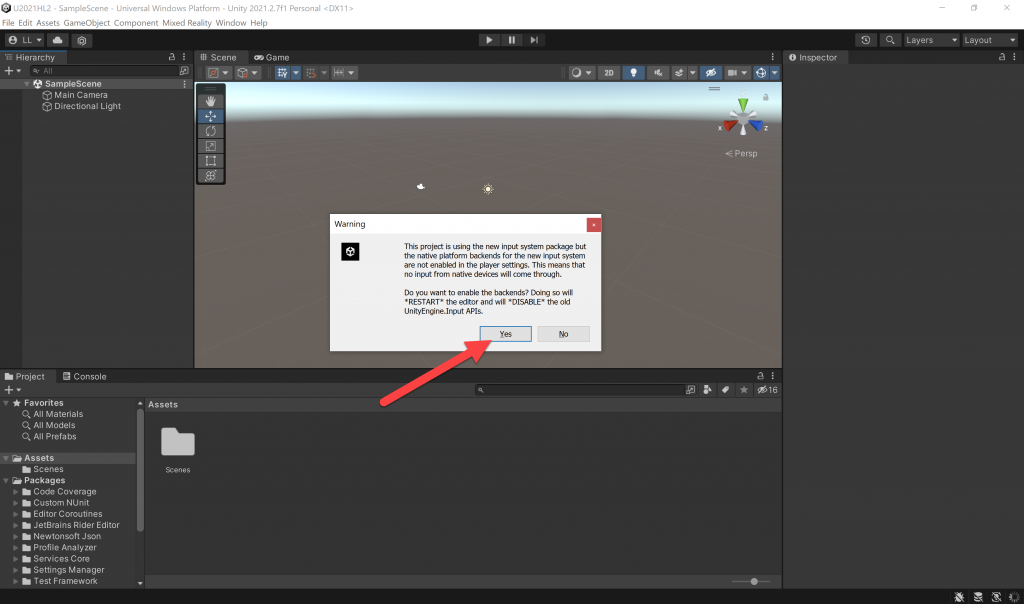
- Click Yes to use the new input system, and Unity will restart
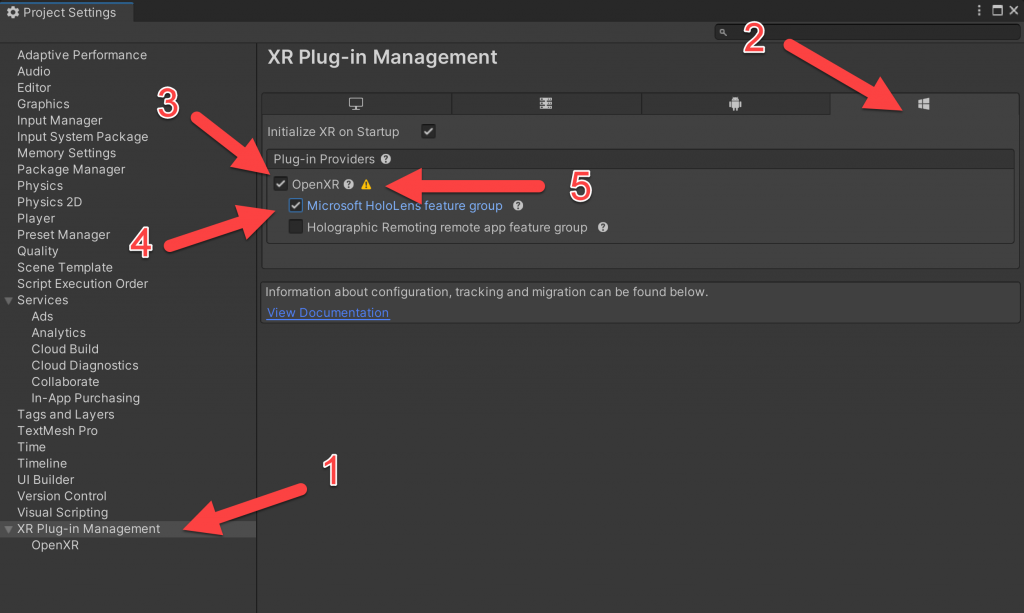
- (Toolbar) Edit -> Project Settings
- (Project Settings) Select XR Plug-in Management -> Click on the UWP Settings tab
- (UWP Settings) Check OpenXR -> Check Microsoft HoloLens feature group
- (UWP Settings) Next to OpenXR -> Click the Warning Icon
- (OpenXR Project Validation) Click Fix All
- (OpenXR Project Validation) If you’re left with “At least one interaction profile must be added.” -> Click on Edit
- (Project Settings) OpenXR -> Interaction Profiles -> Click “+“
- Add Eye Gaze Interaction Profile
- Add Microsoft Hand Interaction Profile
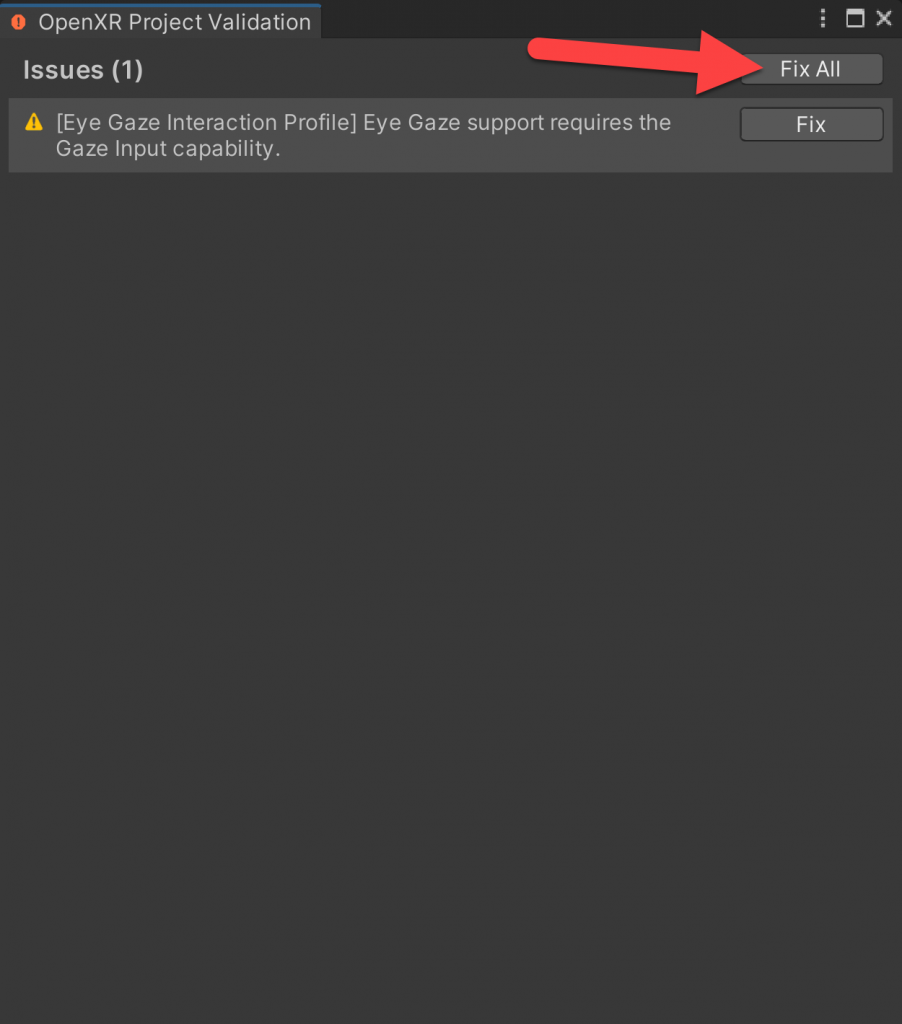
- (Project Settings) Next to Eye Gaze Interaction Profile-> Click the Warning Icon
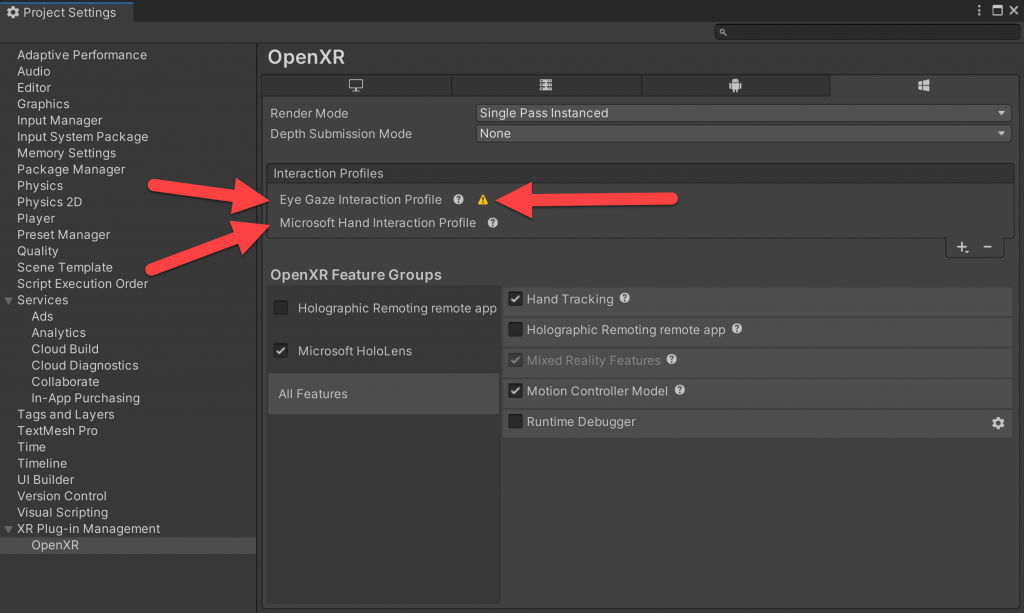
- (OpenXR Project Validation) Click Fix All
- (Windows Settings) Check OpenXR -> Check Microsoft HoloLens feature group
- (Toolbar) Mixed Reality -> Project -> Apply recommended project settings for HoloLens 2
- (Project) Select Assets -> Drag the unity packages into the Project window one at a time
- [Required] Microsoft.MixedReality.Toolkit.Unity.Foundation.2.7.2.unitypackage
- [Recommended] Microsoft.MixedReality.Toolkit.Unity.Tools.2.7.2.unitypackage
- [Optional] Microsoft.MixedReality.Toolkit.Unity.Examples.2.7.2.unitypackage
- [Optional] Microsoft.MixedReality.Toolkit.Unity.Extensions.2.7.2.unitypackage
- [Optional] Microsoft.MixedReality.Toolkit.Unity.TestUtilities.2.7.2.unitypackage
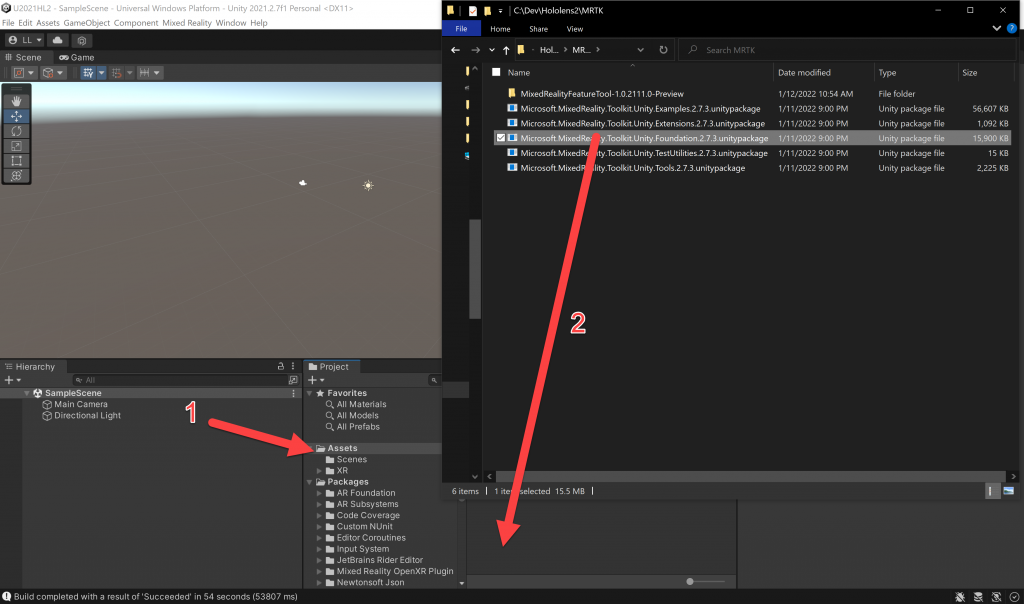
- (Import Unity Package) Click Import

- Once you’ve installed MRTK unity packages and switch back to Unity, it should bring up the MRTK Project Configurator
- (MRTK Project Configurator) Click Apply Settings -> Click Next
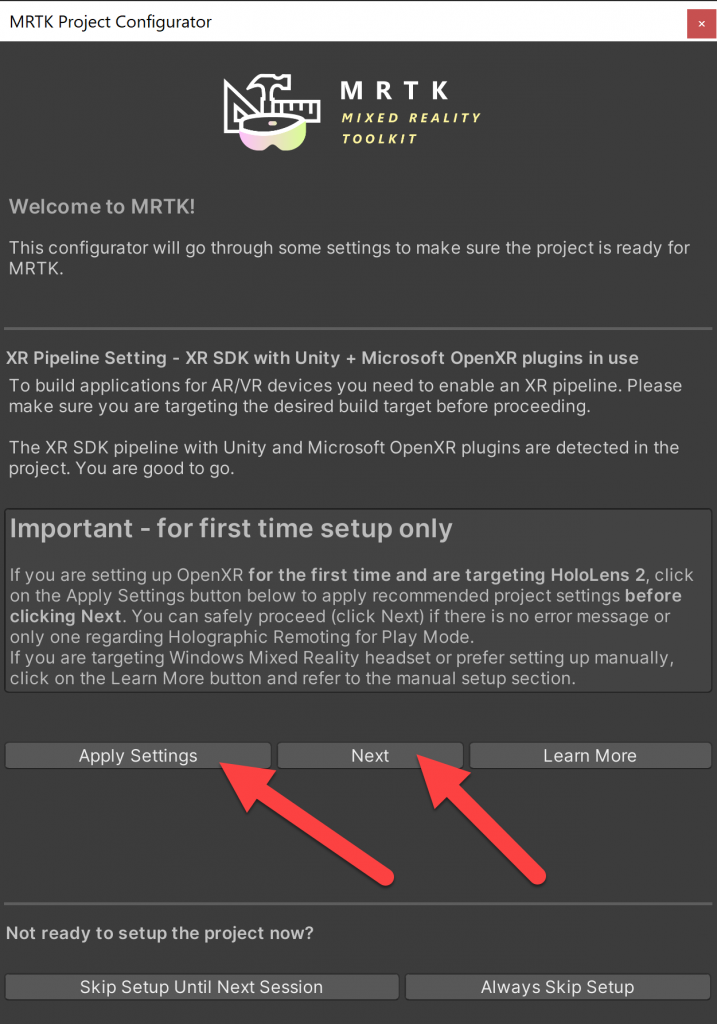
- (MRTK Project Configurator) Click Apply
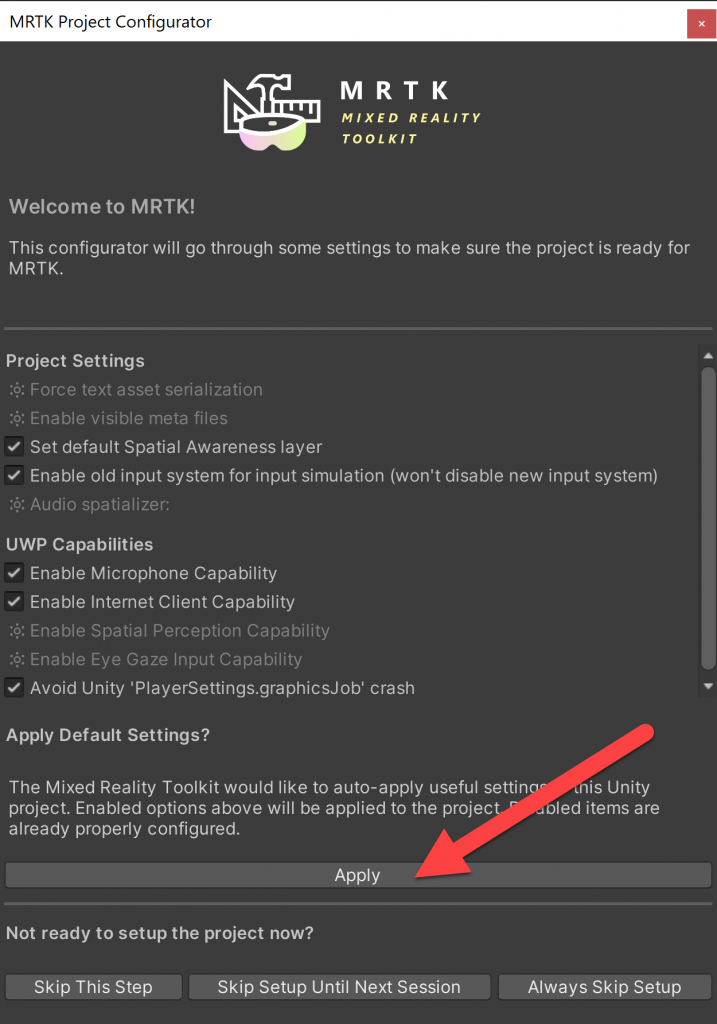
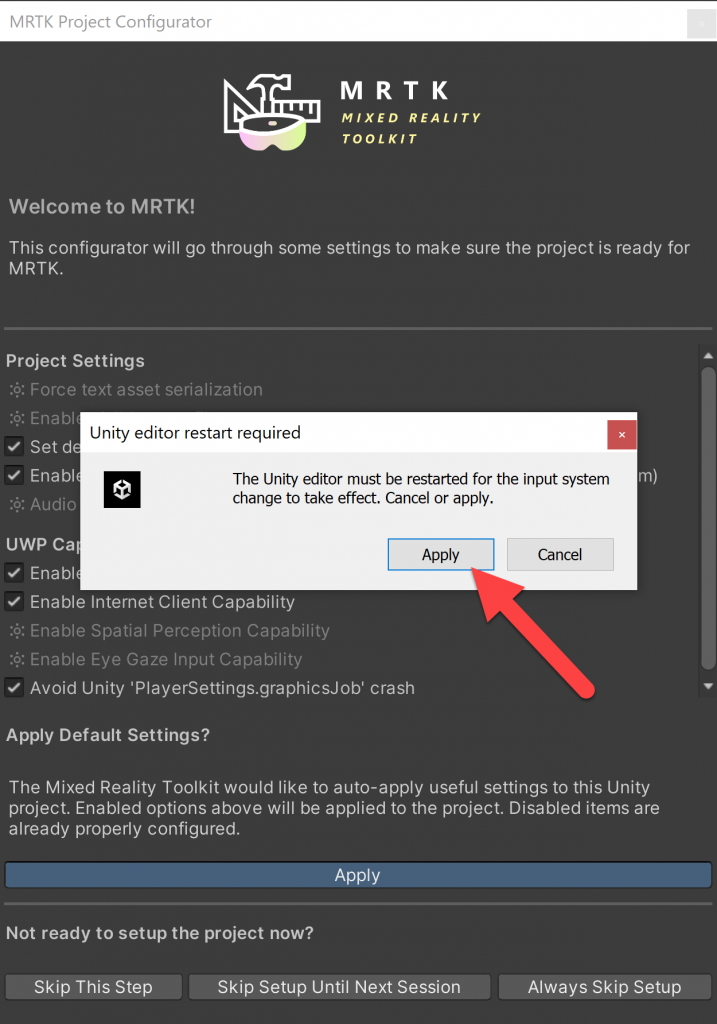
- (MRTK Project Configurator) Click Apply -> Unity will restart
- [Bonus Content] You’ve officially configured your project! Whew…. Now let’s configure your scene!
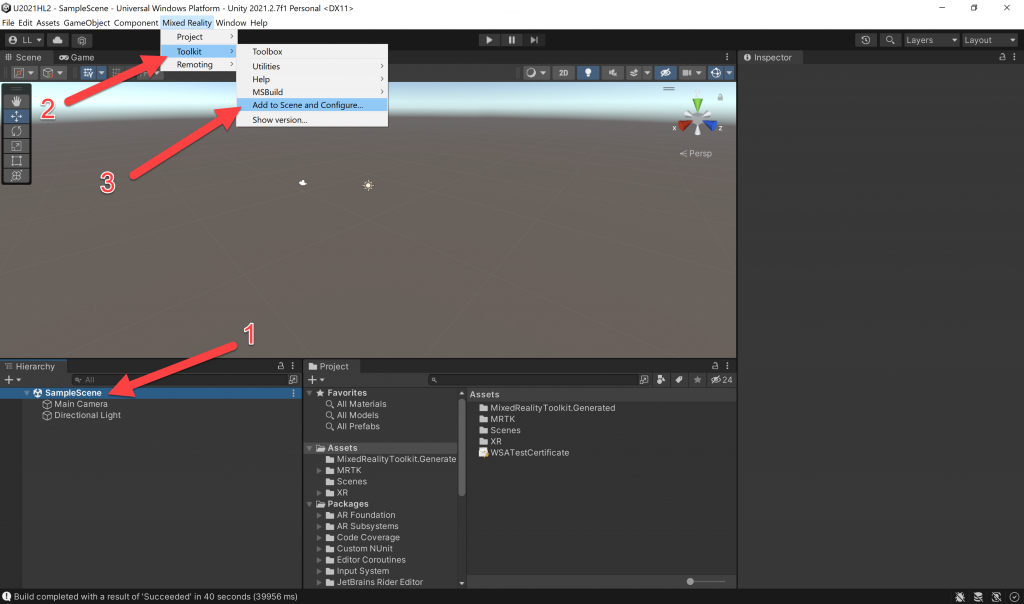
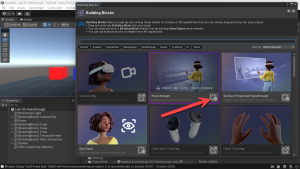
- (Hierarchy) Select your scene -> (Toolbar) Mixed Reality -> Toolkit -> Add to Scene and Configure…
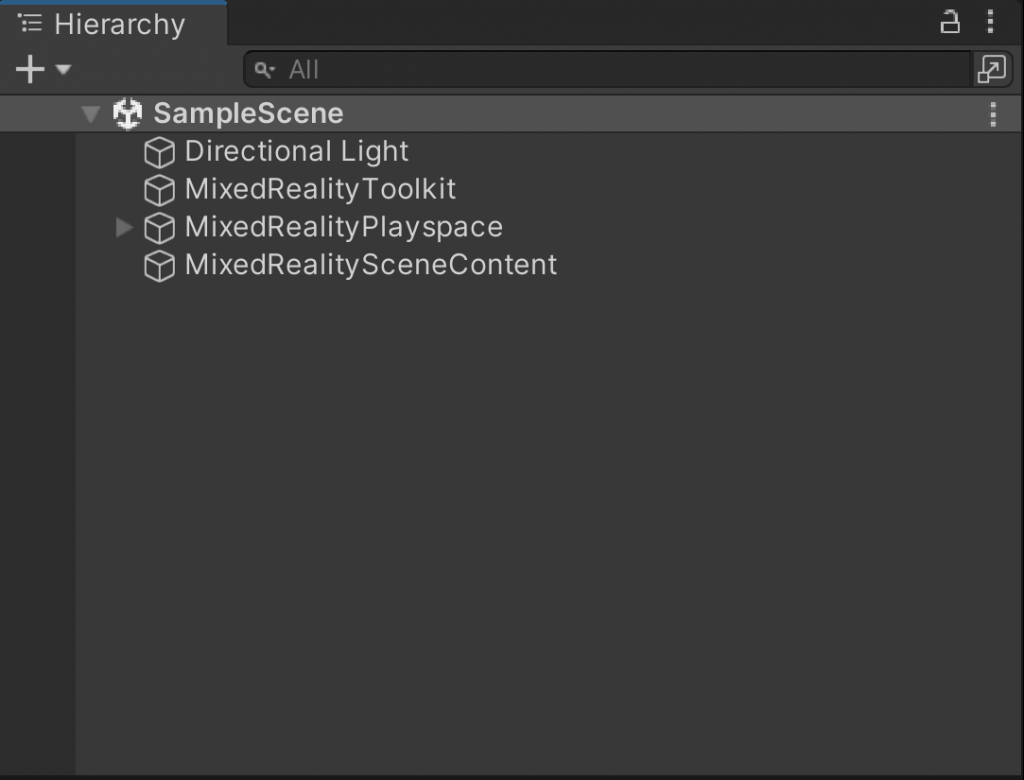
- You’ll now see the following in your scene!
- (Hierarchy) Expand MixedRealityPlayspace -> Main Camera -> (Inspector) Camera -> Change Background to Solid Color -> Set to black
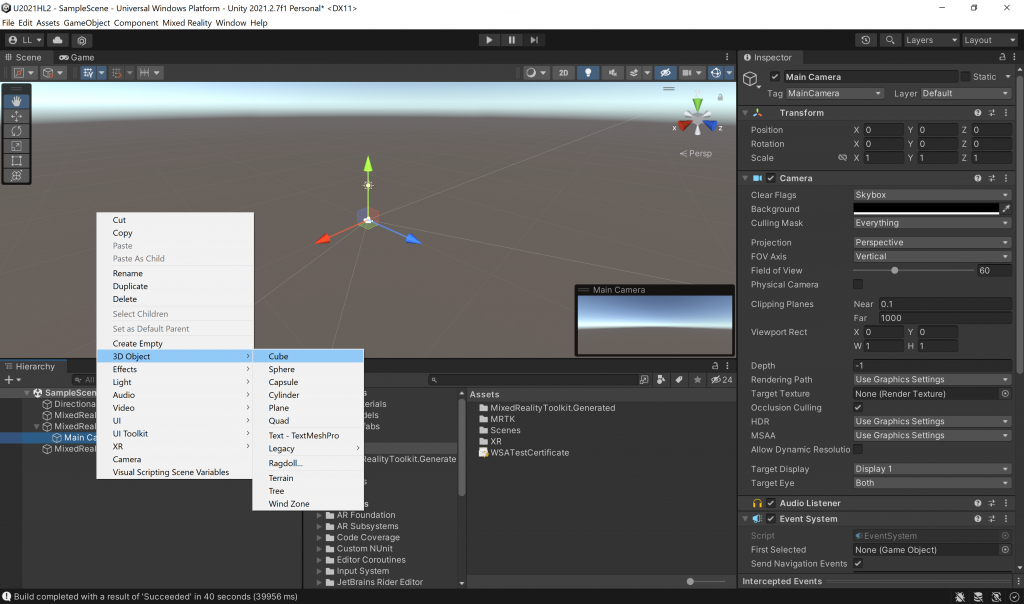
- Let’s add a 3D cube so we have something to look at…
- (Hierarchy) Right click -> 3D Object -> Cube
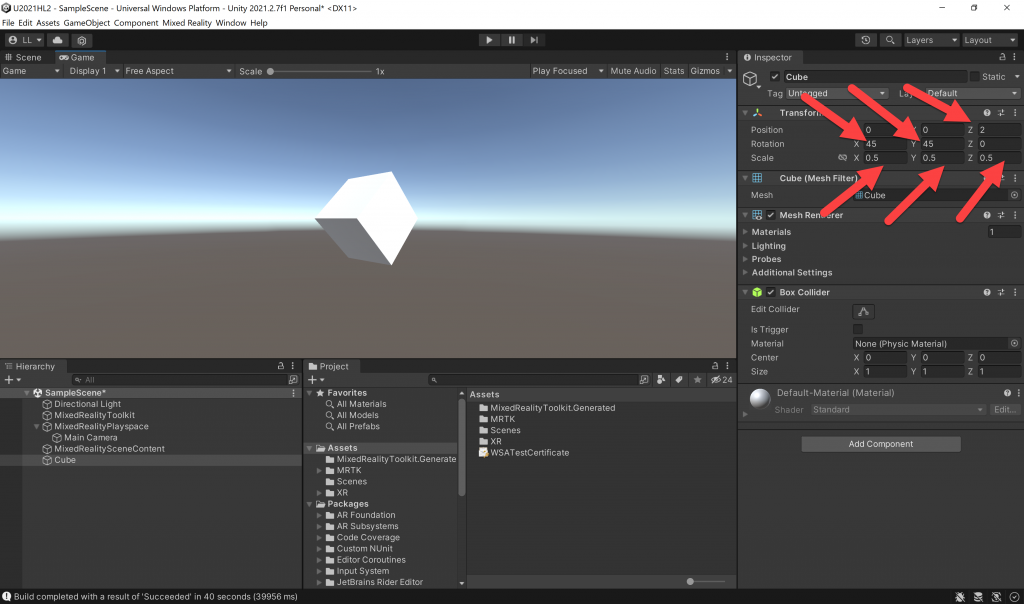
- (Hierarchy) Select Cube -> (Inspector) Set the Transform of the cube as shown
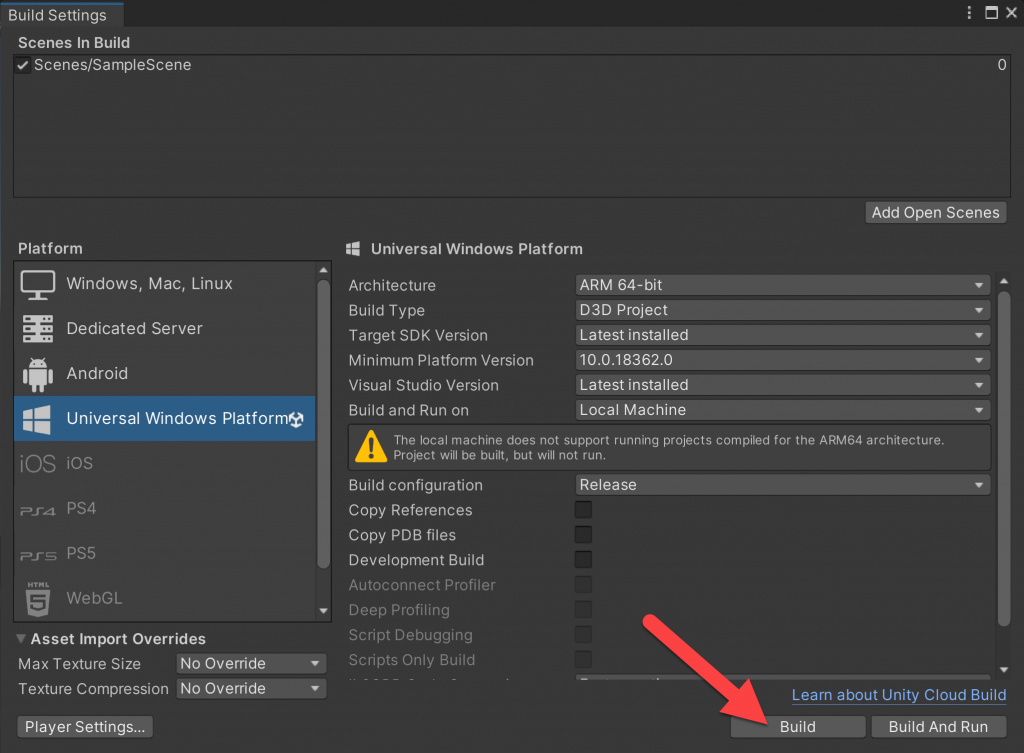
- (Toolbar) File -> Build Settings… -> Build
- Create a directory -> I generally create a folder named Install
- (Windows Explorer) Click on the *.sln file in your Install folder (assuming that’s what you named it)
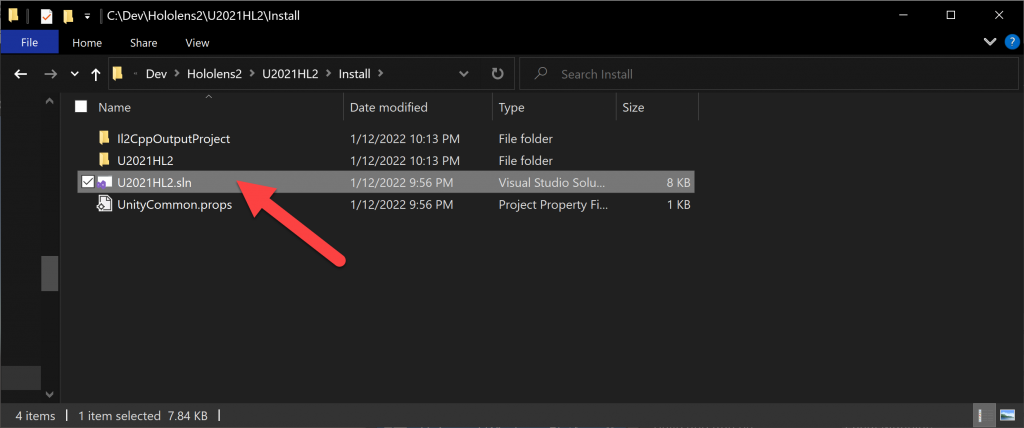
- (Visual Studio) Change to Release -> Change to ARM64 -> Change to Device -> Click on Device to deploy (make sure to have your Hololens 2 connected to your computer)
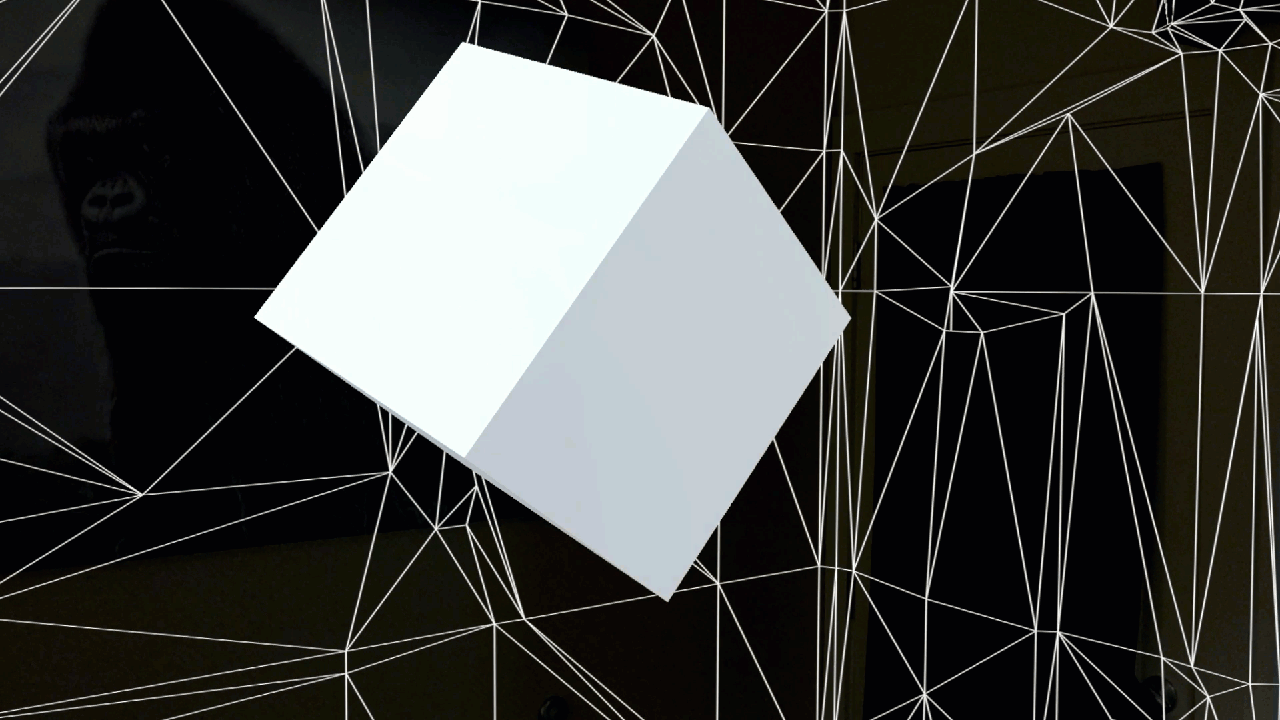
- Look at that! You now have a HoloCube in Mixed Reality – congratulations!
Love any feedback and see you in future XR blog posts.
Build something amazing in XR! — Lance
Here’s my XR Step-by-Step blog series for the Hololens 2 to help you create your XR experiences!
1) Installing the Tools you need for XR development == Unity 2021
2) Installing the Tools you need for Hololens 2! Unity 2021 + MRTK 2.7 + Visual Studio 2022
3) Setting up your Hololens 2 Project in Unity 2021 + MRTK 2.7 + Visual Studio 2022
4) Low Latency Hololens Streaming (<1s)

Hi there,
Thanks or a article. I have just run through this to refresh myself of the steps and I have a question. When I run the app on the device and close it with the Home button it leaves behind an ugly 2D window. Is there anyway to prevent this from happening?
Regards,
Phil
Yes! Check out — http://www.appzinside.com/2018/04/29/hololens-and-unity-tip-002-set-your-application-icon-and-splash-screen-to-beautify-your-app/